As I always wanted to roast heads of garlic in their skins to make a spread for bread and to use in other dishes, the surplus of last year's garlic crop is finally allowing me to fulfil my desire. A favourite quick and easy dish of mine is linguine tossed in a buttery, garlic/caper/parsley sauce topped with freshly grated Parmesan. This time I substituted mashed, roasted garlic for sauteed, chopped garlic.

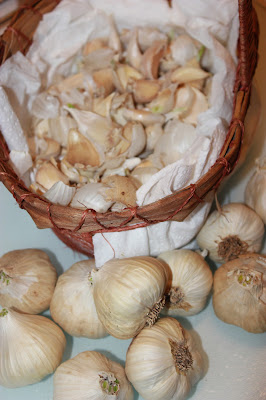
Garlic is the only produce I presently grow enough for not only a year's supply for two but also for sowing next season's crop. I love adding it along with chopped, fresh ginger and red pepper flakes to shrimp fried rice (watch out for the recipe!); I adore throwing in several fat, smashed, unpeeled cloves in braised dishes like Pot-Roast of Leg of Lamb; I delight in sprinkling chopped, fresh garlic over salads like Raw Tomatoes stuffed with Tuna.
Reserve the number of garlic heads you want to roast. With the rest, separate into individual cloves.
Preheat oven to 400 degrees F/205 degrees C. Peel the outer skins off the heads, leaving the individual cloves' skins on. Slice about an 1/2 inch off the tops and dribble some drops of olive over each head, rubbing the oil with your finger to make sure the exposed surfaces are fully coated.

Either wrap each head in foil and place in an individual well of a muffin tin or my preference, tightly packed in a covered casserole dish.
Bake about 40 to 60 minutes depending on size of the heads until browned and the cloves can be easily pierced with a fork. Be careful not to overdo it or the garlic will dry out and harden.

My elation began as the kitchen was filled with the alluring earthiness of roasting garlic. It continued when taking out the garlic, I could see topaz-coloured drops oozing from the cloves. It only increased when I popped out the warm--let them cool a bit, no singed fingers please--semi-liquid innards which I then spread eagerly on a slice of home-made French bread.

There was then an interruption in my elated state as I was disappointed with my first taste. Perhaps my expectations were just too high for something I have been waiting so long to experience. And then, wow, the elation returned with a vengeance, the deliciousness hitting me with a wallop! All I could think was, squeeze out some more, spread some more, put in mouth. Repeat.

After a few slices, I got a glow as if I was exercising, and I then realised I was indeed doing aerobics--it was a demanding schedule to keep! Warm, mashed, roasted garlic spread on French bread is out-of-this-world good! Most likely it will keep in the fridge for several days and can be frozen. I say most likely because there was none left to test that possibility!
The lusty cloud of garlic fragrance permeating the kitchen got to Dayo also. Before I started roasting the garlic he looked like this: calmly observing his realm.

Once the odoriferous brume reached his end of the food-preparation table, this is what Dayo looked like: enthusiastically playing with a paper towel.

The surplus garlic cloves can be frozen easily by peeling and then chopping finely or coarsely per preference. A food processor comes in handy here, but a good knife and some patience does the job also. Remember to freeze the garlic as soon as possible after chopping as the high sulphur content makes it susceptible to stinking to high heavens besides encouraging spoiling. Per Margaret Roach's clever approach to making frozen logs of herbs, put the chopped garlic into the bottom of a freezer bag.

Squeeze the air out of the bag, making a log of chopped garlic at the bottom. Then roll up, secure with string or small clips, and put in the freezer. When needed, remove log and slice off what you need.


Onto the linguine! Put a good sized pot on the boil. Meanwhile, for an ample, one-sized serving gather one and a half-inch diameter of linguine, 1 or 2 teaspoon(s) of mashed, roasted garlic with extra for garnishing, one tablespoon of capers, one tablespoon of fresh, finely minced flat-leaf parsley with extra for garnishing, four tablespoons of Parmesan, one teaspoon of sweet butter, and one teaspoon of extra-virgin olive oil, a pepper mill, and some salt.

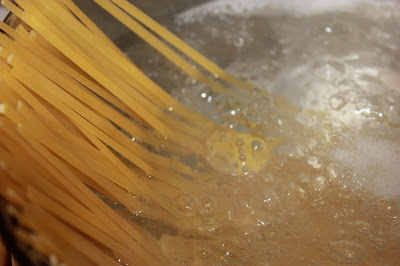
Toss the linguine into the boiling water, stirring carefully--some swear by salting the water, but I refrain since I focus on coating pasta with well seasoned sauces. Boil till slightly undercooked, that is, about a minute less than the recommended time.
Pour the pasta and most of the water into a strainer over the sink, reserving around 1/4 cup of the pasta water. I fit the strainer over a bowl to catch the remaining water. Reserve only briefly because the pasta will stick together if left for more a few minutes. In that case, you could add a little olive oil to keep the strands separate from each other.

Put the butter, olive oil, and the pasta water into the now empty pot and turn the heat on medium low, making sure the mixture is hot. Then add chopped parsley, mashed, roasted garlic, capers, and the pasta. Stir gently until the water is mostly evaporated and the mashed garlic is 'dissolved', not more than a minute as not to overcook the pasta. If necessary the heat can be raised a bit to ease along the thickening of the sauce. Add salt and freshly ground black pepper to taste.

Unceremoniously dump the pasta on a plate and sprinkle with Parmesan. Put some more Parmesan in the centre, cradle some mashed, roasted garlic on it, and place a few parsley sprigs on top. How did I handle that creamy dollop of mashed, roasted garlic nested in cheese? As an appetiser!

What's for dessert you may ask? More French bread spread with mashed, roasted garlic of course! Have I mentioned that mashed, roasted garlic is, well, quite delicious?

In the garden, sowing continues as the rain permits. The peas are now in and safely covered with horticultural fleece to keep them snug and protect them from hungry birds. With our short springs and long summers, mid-march is the time cut-off for sowing a cool-weather crop like peas. Thankfully the rain let up a bit as to allow my honouring this deadline.

The garlic planted last autumn is doing very well and will be eventually harvested late June when the recently frozen supply should be gone.
The blue of bearded irises is beginning to join the already established blue of sweet violets and periwinkle, awaiting for even more blue from lilacs, bluebells, and blue flowering herbs like rosemary and thyme. For many, spring is a time for cheer, but in my garden it is the time for the lovely Blues.

RELATED LINKS
Planting garlic cloves
Harvesting and dry storage of garlic
Sowing peas

Garlic is the only produce I presently grow enough for not only a year's supply for two but also for sowing next season's crop. I love adding it along with chopped, fresh ginger and red pepper flakes to shrimp fried rice (watch out for the recipe!); I adore throwing in several fat, smashed, unpeeled cloves in braised dishes like Pot-Roast of Leg of Lamb; I delight in sprinkling chopped, fresh garlic over salads like Raw Tomatoes stuffed with Tuna.
Reserve the number of garlic heads you want to roast. With the rest, separate into individual cloves.

Preheat oven to 400 degrees F/205 degrees C. Peel the outer skins off the heads, leaving the individual cloves' skins on. Slice about an 1/2 inch off the tops and dribble some drops of olive over each head, rubbing the oil with your finger to make sure the exposed surfaces are fully coated.

Either wrap each head in foil and place in an individual well of a muffin tin or my preference, tightly packed in a covered casserole dish.
 |
| Non-sprouted garlic, that is, garlic without any green bits, is the best for achieving roasted succulence |
Bake about 40 to 60 minutes depending on size of the heads until browned and the cloves can be easily pierced with a fork. Be careful not to overdo it or the garlic will dry out and harden.

My elation began as the kitchen was filled with the alluring earthiness of roasting garlic. It continued when taking out the garlic, I could see topaz-coloured drops oozing from the cloves. It only increased when I popped out the warm--let them cool a bit, no singed fingers please--semi-liquid innards which I then spread eagerly on a slice of home-made French bread.

There was then an interruption in my elated state as I was disappointed with my first taste. Perhaps my expectations were just too high for something I have been waiting so long to experience. And then, wow, the elation returned with a vengeance, the deliciousness hitting me with a wallop! All I could think was, squeeze out some more, spread some more, put in mouth. Repeat.

After a few slices, I got a glow as if I was exercising, and I then realised I was indeed doing aerobics--it was a demanding schedule to keep! Warm, mashed, roasted garlic spread on French bread is out-of-this-world good! Most likely it will keep in the fridge for several days and can be frozen. I say most likely because there was none left to test that possibility!
The lusty cloud of garlic fragrance permeating the kitchen got to Dayo also. Before I started roasting the garlic he looked like this: calmly observing his realm.

Once the odoriferous brume reached his end of the food-preparation table, this is what Dayo looked like: enthusiastically playing with a paper towel.

The surplus garlic cloves can be frozen easily by peeling and then chopping finely or coarsely per preference. A food processor comes in handy here, but a good knife and some patience does the job also. Remember to freeze the garlic as soon as possible after chopping as the high sulphur content makes it susceptible to stinking to high heavens besides encouraging spoiling. Per Margaret Roach's clever approach to making frozen logs of herbs, put the chopped garlic into the bottom of a freezer bag.

Squeeze the air out of the bag, making a log of chopped garlic at the bottom. Then roll up, secure with string or small clips, and put in the freezer. When needed, remove log and slice off what you need.


Onto the linguine! Put a good sized pot on the boil. Meanwhile, for an ample, one-sized serving gather one and a half-inch diameter of linguine, 1 or 2 teaspoon(s) of mashed, roasted garlic with extra for garnishing, one tablespoon of capers, one tablespoon of fresh, finely minced flat-leaf parsley with extra for garnishing, four tablespoons of Parmesan, one teaspoon of sweet butter, and one teaspoon of extra-virgin olive oil, a pepper mill, and some salt.

Toss the linguine into the boiling water, stirring carefully--some swear by salting the water, but I refrain since I focus on coating pasta with well seasoned sauces. Boil till slightly undercooked, that is, about a minute less than the recommended time.

Pour the pasta and most of the water into a strainer over the sink, reserving around 1/4 cup of the pasta water. I fit the strainer over a bowl to catch the remaining water. Reserve only briefly because the pasta will stick together if left for more a few minutes. In that case, you could add a little olive oil to keep the strands separate from each other.

Put the butter, olive oil, and the pasta water into the now empty pot and turn the heat on medium low, making sure the mixture is hot. Then add chopped parsley, mashed, roasted garlic, capers, and the pasta. Stir gently until the water is mostly evaporated and the mashed garlic is 'dissolved', not more than a minute as not to overcook the pasta. If necessary the heat can be raised a bit to ease along the thickening of the sauce. Add salt and freshly ground black pepper to taste.

Unceremoniously dump the pasta on a plate and sprinkle with Parmesan. Put some more Parmesan in the centre, cradle some mashed, roasted garlic on it, and place a few parsley sprigs on top. How did I handle that creamy dollop of mashed, roasted garlic nested in cheese? As an appetiser!

What's for dessert you may ask? More French bread spread with mashed, roasted garlic of course! Have I mentioned that mashed, roasted garlic is, well, quite delicious?

In the garden, sowing continues as the rain permits. The peas are now in and safely covered with horticultural fleece to keep them snug and protect them from hungry birds. With our short springs and long summers, mid-march is the time cut-off for sowing a cool-weather crop like peas. Thankfully the rain let up a bit as to allow my honouring this deadline.

The garlic planted last autumn is doing very well and will be eventually harvested late June when the recently frozen supply should be gone.
 |
| Young garlic plants in the background, nursery bed of 2-year-old laurels in the foreground |
The blue of bearded irises is beginning to join the already established blue of sweet violets and periwinkle, awaiting for even more blue from lilacs, bluebells, and blue flowering herbs like rosemary and thyme. For many, spring is a time for cheer, but in my garden it is the time for the lovely Blues.

À la prochaine!
RELATED LINKS
Planting garlic cloves
Harvesting and dry storage of garlic
Sowing peas