Wednesday, 4 April 2012

Hills of Strawberries


Here in southwest France, spring is going at a breakneck speed.  In fact, it is rapidly morphing into early summer as our summertime lasts about six months.

Rhubarb waking up

Bearded Irises going at full throttle

The strawberry plants are beginning to flower which means I will need to fertilise the two beds.

Two-year-old plant forming tiny yellow berries in the flower's centre

However, I have some transplants to do first.  Placing the crown just at the right level is important because if planted too high, roots will dry out, if too low, the crown will rot.  Hilling accomplishes the correct placement very nicely.  Start by loosening the soil with a spade or a fork to a depth of five to six inches depending on the length of the roots.  Very long roots can be trimmed.


Using a trowel, dig a circular trench, depositing most of the soil outside the trench and some on the centre mound which needs to be an inch or two above level ground.  Firm the mound lightly.

Voilà!  A little moat.

Spread gently the roots over the mound, tucking any extra length around the trench.

Crown is the light-green, fleshy, triangular part just above the roots' top

Fill in the circular trench with soil, firming the planting by cupping your hands around the crown while pressing down.  Plant should not wobble, that is, the crown should be securely supported by soil while not being completely buried.  The carrot seed packet shows the slant of the hill, otherwise not very visible in the below photo.  To accommodate hilling in my block beds, I space the strawberries farther apart (about 15 inches) than the usual denser planting.


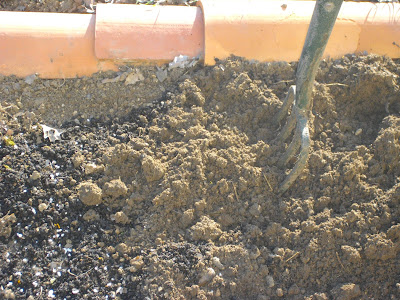
On to fertilising which consists of sprinkling the recommended amount around each plant about a few inches away from the crown, and then lightly scraping the granules into the soil, being careful that the shallow roots will not be disturbed.  Water well.

Using the cultivator's side instead of the prongs avoids damaging roots

Though a basic 10-10-10 will suffice, one with an NPK number where phosphorus and potassium (second and third numbers) are higher than the first number (nitrogen) would be better as phosphorus and potassium are needed for root and fruit development.  The first application is done as soon as the flowers appear and the second one is after harvest.  As soon as the season's first mowing of grass clippings dry, I will mulch the strawberry beds to keep the berries off the soil and to conserve moisture.

This natural 5-6-8 fertiliser can be used also for raspberries and currants

Strawberry plants are productive for about three years.  However, there will be no berries the first year if you follow the recommendation by the experts and pinch all flowers off to promote strong root development, and even if you don't pinch them off, there will be just a light harvest.  It is the second year where the biggest production occurs.  Third year is heavier than the first, but not as generous as the second.

Second-year strawberry bed followed by a first-year planting

There are efforts to produce an annual strawberry which would simplify their care.  But until then, if you want a satisfying crop of berries (they are the Calm One's favourite fruit), you need to plan each spring for there to be plants entering their second year.  Happily, once you buy your initial plants--usually shipped as bare roots and planted either in the fall or early spring--they will produce enough runners which can be used for propagation.  Some gardeners sell their extra baby plants for a bit of pocket money.

Strawberries, along with tomatoes, are one of the commercial crops containing the highest level of pesticides because of their susceptibility to disease. In home gardens, however, meticulous rotation works wonders in keeping them mostly disease and pesticide free.  Also, the taste of home-grown strawberries and tomatoes are incomparable as so many delicious varieties are available which can not be found in markets.

Wednesday, 28 March 2012

Unblocking Food Potential of Small Gardens


Bearded Irises will be in full bloom in several weeks

Young pea shoots are one of the earliest harvests of all.  About two/three weeks later after sowing, thinning out the pea bed results in a good amount of succulent three-inch-high shoots.  


Though they can be eaten raw in salads, my favourite way is to sauté two cups of loosely packed, sliced, and washed pea shoots (shoots pinched off at the ground usually are entirely edible, however check for any fibrous lower stems requiring trimming) with minced garlic and some red pepper flakes in about a tablespoon of olive oil over medium heat in an omelette pan for about five to seven minutes till tender.  Scoop out the greens and reserve in a small bowl.  The residual olive oil should suffice.  Pour into the skillet three beaten eggs.  

While omelette is setting (lift up the perimeter bit by bit with a spatula to let liquid egg seep underneath), spread evenly the tender pea shoots and grated Gruyére on top, leaving about an inch around the edge free of topping.  Cover and leave on low heat for about a minute or two till the cheese melts, and then fold one half over the other with a spatula and slide onto a plate.  Cooked shoots taste somewhat like oriental greens. However, when consumed raw, they retain a fresh pea taste.

Pea shoots turn dark green resembling spinach when cooked

A rough estimate is--if we could even find veggies/fruits of similar quality and variety--it would cost us about ten thousand dollars annually to buy what we grow.  Might as well toss in the equivalent of a gym membership and weekly therapy sessions as gardening keeps me both physically fit and mentally sane.  Well, at least, a bit saner. 

Block-bed style, whether raised or not, is advantageous for small gardens because more can be grown, crop rotation is made simple, and preparation/maintenance of planting areas can proceed gradually and orderly.  Block beds can still be framed but not raised.  I have framed my level, thirteen 4-foot-by-12-foot beds with terracotta roofing tiles.  There was a small mountain of them heaped next to a dead cherry tree.  I began with just one bed off in a corner and gradually through two years, with the help of the Calm One, there is a good portion of our garden in a food-producing state.  Framing the beds this way is borrowing from the French approach of parterre, lending a pleasing structure to our garden.

The Calm One devised this string template to guide shaping rectangular beds
Tiles keep oak-leaf mulch neatly in place in centre bed

Paths between the beds need to be wide enough--at least a width of two feet--to allow for the passage of wheel barrows and to be able to kneel easily between beds.  Various weeds and grasses covering the paths are kept trimmed with my blue buddy, an lithium-battery-powered line strimmer.


Taking a much deserved rest

Horticultural fleece can be tucked easily under the tiles.  Fleece is so useful.  It protects crops from surprise frosts, extends the growing season, stops birds and other animals from eating/disturbing seeds, and protects against insects, especially carrot fly.  Fleece allows both sunshine and water to pass through.  I use the biodegradable form which lasts about two to three years, and then can be composted.  Tiles hold down flattened cardboard when I sheet compost (using the weeds already growing in place as a source of compost).

Living in a small city is convenient for finding discarded large cartons

The tiles act as slug traps.  Slugs crawl under them during the day to escape the sun.  I go down the sides of the beds, partially lifting up tile by tile, scrapping the slugs into a can of water.  Once drowned, they go on the compost pile.  But the real reason for the tiles is that Dayo insists on having a solid, dry surface to walk on.

Dayo strolling between the garlic and onion beds

Since veggies are grown so close together in block beds, the plants themselves act like a mulch, conserving moisture and retarding weed growth while looking attractively bushy.  Because I usually fill a bed with an particular veggie, it is not necessary for me to label the plantings. Each year, I make a rotation plan of what will grow in which bed covering three main harvests each year as my focus is intensive gardening, that is, getting the most food out of our garden.

One drawback so far is when hilling plants, like potatoes and strawberries, there is not enough spare soil since block beds are planted so densely.  Spacing strawberries a bit farther from each other than usual works a treat, and for potatoes I use compost and grass clippings to ensure that the growing potatoes will not poke up and turn green because of light exposure.  Another drawback is when initially weeding--before the bed can fill out and act as a living weed-suppressing mulch--it is best to forgo long-handled tools and get at the weeds up close with smaller tools.

Monsieur M often says when he spots me lightly spading a block bed, use the spading fork, it will be easier.  I tell him in my broken French that because I never walk on the beds, the soil is loose and it is easy using a spade.  He always looks puzzled and doubtful--no idea if it because of my badly spoken French, or he just does not believe me, or what is most likely, he is teasing me.  In any case, the frequent fork suggestion has become a precious part of my gardening routine, never failing to leave a smile on my face.

RELATED LINKS

Sowing Peas


Wednesday, 21 March 2012

Ready, Set, Onion!

Dayo has the greatest knack of settling down into places providing both security and good views.

He is checking out if I will harvest something interesting, like pork, fish, or milk.

The garden guides my activity.  It says it's time to harvest the last of the winter crops to make room for warm-weather varieties.

Garden-fresh Brussels sprouts have a delectable nutty, slightly sweet taste

Solid honey or carrots? 

Leeks ready to be thoroughly washed

The last of the mâche (superb fresh greens all through winter)

Home-grown onions are wonderful.  Though proper carmelizing of onions is essential for a really good French Onion soup, home-grown onions take it to another level.  The main types are regular (Allium Cepa) and potato/multiplier onions (Allium Cepa var. aggregatum, that is, perennial onions once used in home gardens and fast becoming popular again).  Onions can be grown via seeds, transplants, and sets.  Seeds need more time from sowing to harvest, while transplants and sets take less time. However, there are usually many more intriguing varieties available as seeds. 

For regular onions, I prefer to use sets which are just tiny immature onions.  If planted thickly, some can be harvested as scallions/green onions before reaching maturity, allowing more space for the rest to mature fully.  Onions planted in early spring will be ready for harvest by July.

Block bed containing around 250 Stuttgart onion sets


With my trusty rake, I make short furrows down the whole bed, placing the sets around four inches apart (for harvesting some immature onions as scallions, place closer together) and about one inch deep.  If a bit more depth is required for some of the huskier ones, deepen the furrow with a finger tip and gently place the set, taking care not to press down, as the basal plate can get damaged.  I discard any soft, damaged, rotten sets.  

With the back of the rake I first cover the rows with soil, then tamp down the bed, and finally water well.   If the birds consistently pull out the baby onions by their tops, I cover the bed with horticultural fleece.  So far,  just one set was yanked out (and dutifully replanted). There is no need for labelling as the entire bed is filled with onions.

Onions putting out green growth about a week later

The rather bossy lettuce seedlings are telling me to transplant them now.  Off I go! 

RELATED POSTS

General information on soil preparation for sowing
Leek and Potato soup recipe (cleaning instructions for leeks included)
Fertilising young onion plants


Wednesday, 14 March 2012

The Little Things in Life

The daffodils are giving me some confidence that this time spring will stick around.

A bit tattered by the wind

Hence, sowing seeds directly in the soil will become a major focus for several weeks.  Peas, onions, lettuce go first, then spinach, carrots, beets, most annual herbs, and potatoes follow along with annual flowers like Sweet Alyssum (Lobularia maritima).  At the same time, seeds needing warmth to germinate, such as tomatoes, bell peppers, cucumbers, basil, melons, summer squash, and annual flowers like Black-eyed Susan vine (Thunbergia alata) will be sowed indoors. 

Seeds are awe inspiring.  Annual vegetable/flower seeds are small, but packed with all they need to develop into plants producing more seeds to make the next generation.  A tiny beefsteak tomato seed takes about five months from sowing to harvest to yield many huge and luscious tomatoes. Though this information is commonly known, it is nothing short of astounding actually witnessing this rapid growth in your own garden.  Using seeds rather than store-bought transplants is economical and allows greater choice. 

Some of the pansies started from seed last autumn

Seeds lose their freshness along with their germinating ability within a few years.  Since most packets contain more seeds than can be used in a single season, any surplus is stored in airtight containers in a cool, dark place.  In late winter, germination tests need to be done.  A few seeds are placed on wet paper towels which are folded over, labelled, put in a shallow container (like recycled jar lids), and kept moist.  In several days, the results are checked.  Once an inventory has been made of viable seeds, any necessary purchases may be added to your existing collection.

Pea seeds got a top grade on their test

My pea seeds from last season tested positive for viability.  There are two kinds of shelling peas, smooth and wrinkled.  Both kinds can come either in vining or bush form.  I sow smooth, bush peas because they are considered rustique (able to withstand cold) and requires no staking therefore fitting nicely into my block beds. Wrinkled are more heat resistant, but in general shelling peas like to stay cool, that is, within a range between 50 and 60 degrees F.

I sow in early spring and again in late summer for two annual crops.  The variety I sow, d'Annonay, takes about two and a half months after sowing to become harvest size.  If a surprise frost does happens, I just whip out some horticultural fleece and the pea plants remain snug under its protection.   Using fleece also prevents birds from eating the seeds.

Fleece tucked under the terracotta roof tiles framing the block bed

Soil preparation consists forking in some fertiliser (N-P-K of 10-10-10) and compost.   Since the block beds never get walked upon, there is no impaction of soil and no need for additional spading once they have been initially dug by the Calm One.  During winter, the soil was protected from erosion due to rain, snow, and wind by being heavily mulched with dead oak leaves.  I try to disturb the soil only when incorporating compost, transplanting/sowing, and weeding.

Dark-brown compost and fertiliser granules on the left, ready to be forked in

After raking the bed level and free of clods (such clods are taken to low spots in paths to level them out), I make two-inch-deep furrows about five inches apart with the end of the rake.  I plop down the peas about an inch from each other.  If the planting is crowded, young pea shoots can be harvested as they are delicious in stir fries and salads. The back of the rake is used to fill in and tamp down the little trenches, ensuring the seeds are firmly surrounded by soil. I finish with a thorough watering. Labelling is usually not required as just one crop fills each block bed. 

Note the row covered and firmed down in the lower right

Garden peas have a delicious after-taste of buttery caramel, though this may be my particular reaction to them.  Regardless, the difference between store bought and home grown is stupendous.  

Pea shoots about two weeks later

Vegetable gardens generally have a compelling green presence, but young pea shoots are particularly lovely, as in the words of Nathaniel Hawthorne:  

I used to visit and revisit it a dozen times a day, and stand in deep contemplation over my vegetable progeny with a love that nobody could share or conceive of who had never taken part in the process of creation.  It was one of the most bewitching sights in the world to observe a hill of beans thrusting aside the soil, or a rose of early peas just peeping forth sufficiently to trace a line of delicate green.

RELATED LINKS

Pea shoots omelette recipe


Wednesday, 7 March 2012

Pruning Prune Plums

When first seeing the neglected state of various fruit trees in this forty-year-old garden, I was sure I could gradually restore them to robust production.  Two years later:  4 thriving, 5 languishing, 5 dead.

Wood pigeon resting on the Golden Delicious apple tree

The largest casualty was a thirty-foot cherry tree.   It was chopped down by a trio of rough-and-ready workers who entered our quartier last spring to work bomb it.  It was a case of my will against theirs:  Chop down the cherry tree, nothing else, yes, just the cherry tree.  That's right,  see the cherry tree over there, the big, dead tree, chop it down, no, don't prune the pear tree, it's the wrong season, chop down the cherry tree.  No, I don't want the shed painted, chop down the cherry tree.

On their bill, under the reason why the work was done was this quaint phrase: a la fin de vie (at the end of its life).  I felt comforted the fact it had a life was recognised. 

Pile of cherry tree limbs obscuring the thick, forked trunk

Pruning fruit trees and bushes assures a good harvest.  Chez nous, there are figs, apples, pears, peaches, plums, gooseberries, blackberries, raspberries, red/black currants, and grape vines.

Avocado filled with grape jelly (last jar!) made from previous season's grape harvest

Prunier d'ente is a plum tree bearing egg-shaped, deep-purple plums.   The one in our front garden, other than for an annual bout with mites which I successfully hose off each spring, is flourishing.  Its ample harvest provides enough jam lasting most of the year, along with plum leather which disappears within a few weeks because it so delicious we just can't stop until it is all gone.  However, this variety of plum is grown mainly for making prunes, that is, pruneaux (dried plums), as prune means fresh plum in French.  Perhaps this season, I will try my hand at drying some.

Prunier d'ente and lavender in front garden

An essential element of pruning is apical dominance.  I use the analogy of an leader training her replacement.  The bud forming the branch tip is the strongest.  However, it is necessary at times to reduce a branch's length, so if an apical bud is cut off, make sure that the cut reaches just above an lateral bud that is going in the right direction, usually outfacing.  This lateral bud will then develop into a branch with an apical bud, keeping the general growth robust, in other words, in the hands of good leadership.

Apical dominance guides an crucial aspect of pruning, dropped crotches.  I love that phrase and will go around the week or so I do all the pruning saying dropped crotches to anyone who will listen.  A tree's height and width is lessened using this technique.  While envisioning giant wish bones, I remove the longer of the two branches down to the wish bone's angled joint, leaving the branch collar (slightly swollen area where a branch joins another) intact as it contains wound-healing chemicals.  Note that the shorter branch remaining retains its apical bud. 

Besides reduction of width and height, the inner space of the tree needs to be opened to sunshine, and any limb rubbing against another is removed along with dead/diseased/injured wood.  Most pruning jobs are done in late winter/early spring when the sap has not yet risen and the bareness allows for thorough inspection of the tree's structure. However, dead wood can be removed any time.  Since spring-flowering bushes bloom on the previous season's growth,  they usually need to be pruned following flowering so as not to eliminate this season's flowers.

Besides grasping that pruning is not shearing, using the proper tools safely is also important.
  
Retractable straight saw, curved saw, secateurs, lopers, leather gloves


There are extensible versions of the basic pruning tools, so climbing onto a ladder or up a tree usually is not necessary.  The goal for small home orchards is to keep the tree at the right height allowing adequate pruning and harvesting with ease.  Nowadays, there also is a great selection of dwarf and semi-dwarf fruit trees.  If interested in more information regarding setting up and caring for home orchards check out Dave Wilson Nursery's YouTube channel.

I am off to prune the pear tree, because those work bombers promised to come back this spring to tame its unruly top with a chain saw.  They obviously know nothing about dropped crotches.


Wednesday, 29 February 2012

Shades of Late Winter

The dominant colour in my garden presently is brown.  The fruit trees trace their brown branches against the sky revealing their need for pruning.  

One of several fruit trees, an Green Gage plum, in need of rejuvenation

The block beds have had their leaf mulch raked away showing brown soil awaiting further preparation for early sowing.

Pea bed in waiting

The strawberry bed is full of plants with mostly brown leaves.

A post-winter tidying up needs to be done before strawberry plants put out
fresh growth

The compost pile is certainly brown, well decomposed and ready to be sieved so beds accommodating the first sowing of the year--peas, onions, and Batavia lettuce--can be amended with this brown gold.

Once sieved, the compost is a fresh-smelling, dark-chocolate brown

Peas, onion sets, and lettuce seeds in their mini
greenhouse made from an recycled mushroom punnet enclosed
 in an ziplock bag

Brown tabby cat is brown, though enlivened with white.

Dayo's favourite perch in the garden--under the pergola
where I cure onions

Sometimes, I don't want to move a muscle, plan anything, and implement any plan.  The long and detail-oriented process of growing, preserving, and cooking my own produce, as delightful as the end results may be, gets bogged down with apathy from time to time.

It becomes easier as seasons roll by, the soil gets better because I not only grow edibles I also grow the soil.  The experience of how fantastic home-grown food tastes compared to what can be bought at supermarkets spurs me on to embrace discipline and follow an orderly sequence of tasks.   But, I have been known to go down to my potting room in the sous sol to grumble and mutter to myself until the doldrums pass.

The garlic bed planted last autumn supplies a plucky touch of green.

Hardneck, that is, winter garlic will be ready for harvest in July

If I peek under the horticultural fleece covering the over-wintered carrot bed, I see more green.

With longer, warmer days, carrots will get bigger and deepen in colour
for an early spring harvest

Soon the rhubarb will add to that green.  Then before I know it, there are so many interesting, invigorating, and gratifying things to do, if someone asked me to define apathy while my racing about from dawn to dusk, I would ask, what is that?  The flow of activity sweeping me along is a sensation as delicious as the fruits of my labour.


Wednesday, 22 February 2012

How Green Is My Leek Soup?


When making Leek and Potato soup, I use the green, tender part of leeks along with the white.  I adore fresh colour, scent, and taste.  The leeks being under six inches of snow for a week has left them somewhat bedraggled.  Fortunately, leeks are one of those vegetables if the cold does not kill them, it makes them sweeter.

Using a spade to harvest leeks

Harvested just enough leeks for the soup

Diagonally trimmed leeks on a marble table in the garden.  When trimming roots, leave the basal plate intact

I also make sure there is no grit.  Place a leek flat on a cutting surface and put a sharp knife's tip just above the bottom root, slicing almost all the way through and past the top. Under comfortably tepid running water, splay out the strap-like leaves using your fingers to scrap/move off dirt.  I wash my home-grown leeks in this meticulous manner twice, as grit in food does not go away.  I rather not enrich the compost with my culinary endeavours!

Cutting leeks this way allows for thorough washing

Store-bought potatoes will have to do as last season's harvest has all been used.   My nursery order for spring recently arrived, and next season's harvest is sprouting, that is, chitting,  in their recycled egg cartons.  Dayo, the young tabby cat, shows his intense love for seed potatoes by licking and nibbling them.  I mercilessly broke up this torrid affair by putting them on the potting room's window sill in the sous sol.  Certified seed potatoes can be chemically treated and this affair may not be healthy for him, but he never listens to me.  When harvesting potatoes, there is no concern because the original seed potato resembles a brown prune.


Dayo confined to his box at the end of the long, food preparation table

Sous sol is not exactly interchangeable with basement.   In France, they come in various forms.  The floor of ours is flush with the back potager as our house is built on a gentle, front-facing slope.  Ours is nicely windowed, unheated, and has  lower ceilings than our living quarters above--a very clever way to divvy up domestic space, practically a vertical version of a longhouse.  

Dayo loves the huge brick barbecue in the potting room which was formerly used as a summer kitchen.  Actually, it is its chimney that intrigues him.  Via shallow ledges, he gets a few feet up it, getting cobwebs and soot on his pink nose.  When first moving here, I went on and on about our fantastic brick bread oven to Monsieur M.  He smiled wanly and said softly, but, it has no door.  Then he told me it was he who built the indoor barbecue as a favour for the previous inhabitant.

The Calm One is wary of what he calls green things in his food, and I have found smooth, creamy soups and his own choice(s) from a selection of interesting toppings aid his receptivity to the vegetable kingdom.  This soup has a medium thick consistency and makes four generous servings.  Served with croutons or French bread and Gruyère cheese, it makes a nourishing, tasty hot meal.

 Recipe for Leek and Potato Soup
  • 3 cups (around 4 medium leeks) of carefully washed, trimmed, thickly sliced (about an inch thick) leeks, including the tender green part
  • 5 medium all-purpose potatoes, cut into quarters
  • 1/2 (120 ml) cup of cream
  • 6 cups (1.4 L) of water
  • Salt and freshly ground pepper to taste
  • one or more of the following for garnishing:  green herbs like chives, chervil, or parsley, croutons, crumbled bacon, crème fraîche, grated cheese like Parmesan or Gruyère, red pepper flakes.

The trimmings on the right are too tough and bitter to be added.

Veggies in an enamelled cast-iron pot

Put the potatoes, leeks, and water in a suitably sized lidded pot, cover, bring to a boil and then lower to a simmer.  Cook until veggies are soft, about twenty-five minutes. Turn off heat and blend with an stick/immersion mixer for the texture you like.  Add cream, gently reheat, and season to taste.  Serve with toppings of choice or au naturel.  

Topped with grated Gruyère


The soup is really a refreshing, light shade of green.  Honest!

When whipping/blending potatoes in general, use a light touch.  They can go grey and gummy if worked too long.  I pulse the soup a few times to break up big pieces, and then continuously blend not more than two minutes on high. If you don't have a stick mixer, you can use a food processor, Foley mill, potato masher, or even just a fork to give some body to the soup.

Bon appétit!

Michelle's Astuce:  If utensils having cooked potato residue are rinsed in cold water soon after use, they are much easier to wash later as an initial hot-water soaking congeals said residue into a hard mass.

RELATED LINKS

Twice-baked potatoes stuffed with leeks recipe