Thursday, 27 February 2020

Photography Series: Winter I

I love the Canon EOS 6D Mark II camera along with a macro 100mm lens that I got two winters ago during the holiday season of 2017. Since it is a complicated bit of equipment, and I wanted to use it as quickly as possible, that is, not in its fully manual mode, nor in its completely automated and unchallenging role, I went for partial automation, to be precise, I chose aperture priority mode, meaning, I get to choose how wide the lens is positioned, while the camera does everything else. En bref, on my camera the lowest f-stop of 2.8 denotes the widest lens opening letting in the most light but providing the least depth of field. It is fantastic for producing the desirable bokeh effect where the background is gorgeously diffused.


Rain on windowpane

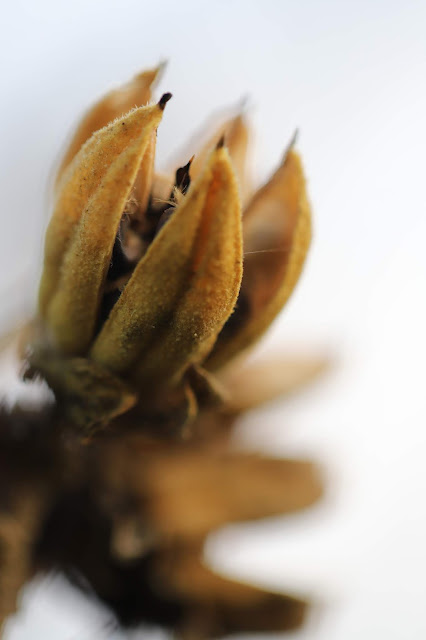
Rose of Sharon's burst seed pod

Fluffy aster seed pods

Rose thorn

Red berry on an aucuba

For a mixed depth of field, where the whitish rock is in the sharpest focus, the broken terracotta roofing tiles are less, and the cement background blurred, I chose f/16.


For the fullest depth of field and also to cut down on glare contributed by city lights, I picked the highest, that is,  f/32.


Factory chimney bathed in the light of the crescent moon? No, it has floodlights on it!

To get decent depth of field for this shot of frozen birdbath water dumped onto the grass, I also selected f/32 while being straddled over the subjects.


Knowing I wanted to let in as much light without sacrificing the frosty details of these penstemons, I picked f/9.


For these unfurling rhubarb buds, as light was less of a problem and I wanted to get as many closeup details as possible without losing the bokeh effect, I dialed to f/20.


I am looking forward to using more and more features on this beauty of a camera. But in general, I keep my photography simple, practical, and fun. The photos also inspire my coloured pencil artwork. I have taken a couple of Coursera classes which I recommend:

Seeing Through Photography

Photography Basics and Beyond (I just audited it for no cost)

À la prochaine!

Thursday, 20 February 2020

Late Winter Garden Doings 2020

The last several weeks chez nous have been marked with increasing activity in the garden. Spades, small and large, pruning saws, a grass-cutting line trimmer, a compost-turning fork, and more are scattered here and there throughout the garden. When locking up for the nightoccurring later and later each timethe order of the day is retrieving all those tools and securing them in the mudroom. The centre bed was planted two autumns ago with daffodil bulbs generously donated by a small, crowded, ten-old patch. Last spring, it sported lots of foliage, but just five flowers! The leaves were allowed to wilt completely, nourishing the bulbs therefore giving forth a prominent splash of the brightest yellow this spring. The spade below is for working the second of three to-be-pea beds. Peas need the soil to be around 4.5 degrees C/40 degrees F, so cool, not cold, but neither warm. Being without a soil thermometer, I instead flipped over a deep clod of earth and touched it. Not yet ready for planting peas. Probably within the week. Otherwise, they will sit and sulk in the wet soil, encouraging rotting. Another sign that sowing is around the corner are the sedges of cranes flying up from North Africa beginning last week.


I looked at those cheery trumpets and thought flower bouquet! And I did need a break. So out came the secateurs. First, several daffodils were cut. Then some heather.


Also a bunch of sweet violets. I needed to reach below the lusty foliage to get at the beauties as they grow up from the plant's base.


They all went in the flower brick on the mantlepiece.


Ah, the FRESH perfume of just cut flowers!


As I was fertilising the asparagus bed, I noticed a volunteer bay laurel seedling. Bay laurels are versatile, hence think of a place for them in your garden, whether as a potted herb or a hedge or a small tree. And what a gorgeous fragrance when clipped! It makes you want to run into the house and cook up a stew. I use them in all three ways, and plus, they are evergreen, wonderful for blocking out whatever needs to be. A pot was filled with potting mix, well watered, and the seedling transplanted. It will remain out of the sun under the pergola, wrapped in its own plastic-bag 'greenhouse' until its roots adapt. Right now it has to rely on its leaves to absorb moisture.


An acquaintance of The Calm One gave us lots of mini-roses. About twenty in total. I gave them a light pruning, will spray against disease like blackspot/mildew and fertilise in the near future. They will remain in their pots this season. Once I see what colour the roses have, I'll decide on their permanent locations, whether in the ground or in planters.


There are two Juniper 'Skyrockets' whose height match my own flanking a laurel hedge on the garden's west side. A month ago or so, strong winds loosened one of them, causing it to list to one side. It was the one with the widest branches so I pruned it a bit to make it as slim as its partner, and then I circled both with paving stones to provide support. So far, so good.


I love compost especially the stuff I make myself which smells like the way it looks, luscious, aerated, and nourishing. There's a nice mound that has overwintered and waiting for a good sieving. Some of it will be forked into the three beds slated for pea sowing.


These seed potatoes are red-skinned, yellow-fleshed, all-purpose, midseason 'Rosabelle' from the local garden centre and are certified disease free. They require several weeks of sitting in old egg cartons on a sunny windowsill so they can grow sprouts a 2.5 cm/an inch or so tall. These have about two more weeks to go. This growth is different from the long, white strands poking out of poorly stored potatoes. These are stubby and coloured from lavender to green or a mix. They essentially are the stems that will grow eventually above the soil, leaving the attached and developing potatoes underground until ready to dig up.


À la prochaine!

Thursday, 13 February 2020

Artwork Series: Learning From Lautrec

My appreciating how wonderful, gorgeous, and evocative Toulouse-Lautrec's artistic expression is does not completely inspire me, because at times his art lends a discouraging perspective giving forth to the nagging, internal question, why bother? My work has so much less quality and oomph. But there's opportunity as precious as his talent, a chance to learn, to improve, and perhaps advance to my own level of excellence. Two of his works, At the Moulin-Rouge: Goulue and her sister (1892) and The Toilette/The Redhead (1889), are the ones that I have interpreted recently. His medium was colour lithography for the former/oil paint on cardboard for the latter; my renditions were done with colour pencils (the very excellent Faber-Castell polychromos) on inexpensive paper. Such paper is good for everyday practicing though I do use high-quality paper for original work. As seen in the below photo, Lautrec is masterful in making one person's positive feature someone else's negative space as in the background's gentleman directly to Goulue's left whose black attire shapes Goulue's shrugging left shoulder. Another example of his wondrous manipulation of space is the shaping of Goulue's shrugging right shoulder is accomplished by the nose of the man directly to her right! This visual cleverness would have been wasted on me if I had not drawn my version.

Lautrec's lithograph: the woman on Goulue's right wasn't her sister, but a can-can dancing colleague,  Môme Fromage (translation: cheese-loving kid!)

I chose to make my version larger though it is challenging to increase the scale while trying to capture proportions among the elements in the picture plane, because it is also a way to push my development by making my drawing more difficult to do.


His of course has the characteristics of a lithography, smooth texture with sharply outlined forms, mine has patchy colour and softer delineations. (Lautrec's is on the left, mine on the right.)


The aspect that drew me to this lithography was the staggering insouciance of Goulue's posture as if there was no one else important but her in the room. Various aspects contribute to her lack of interest in others such as her tilt of chin, her hand defiantly planted on her hip, and her shrug emanating such disdain that it comes as close to a physical slap in your face without being carnally combative. That shrug was not captured perfectly by me, but it came close enough. (Lautrec's is on the left, mine on right.)


The second work, The Toilette/The Redhead, is nothing short of magnificent. I love the colours he used, among others, the blues both warm and cool; I love the rumpled fabric of her clothes and background draperies; I love her hair, especially her slightly unraveling chignon; I love the helter-skelter placement of all the components, from her slightly forward leaning torso to the chair, table, and bathtub; I love that the light is coming from behind her.


My version below got some of the aspects that I found alluring.


Her figure was much more forward leaning because I deviated from the plumbline that I had drawn down her centre. Her lower leg, clothed in a stocking, was less foreshortened. (His is on the left, mine on the right)


My incising the floor area under the chair with a rounded tool before I did any colouring resisted any pigment therefore giving the impression of floor boards. Same technique was used for highlights in her hair.


His (the below left photo) had less pronounced floor boards and a hair bun proportionally smaller than mine (on the right).


Lautrec is an excellent teacher and I am a half-way decent student!

À la prochaine!

RELATED POST

Artwork Series: Faber-Castell Polychromos Pencil Drawing of Two Desert Roses

Thursday, 6 February 2020

Raspberry Jam Love Notes

These delectable love-note pastries, not only suitable for Valentine's, but also for snacks, desserts, and breakfasts, are simple to make. At first try, the notes most likely won't be perfectly sealed and presented, mine certainly weren't, but they look adorable enough. Since I always freeze pastry scraps left from making pies, I just had to defrost my home-made dough. Good quality from the shops would work fine also.


Ingredients
Adapted from Delish (video)
makes four pastries, recipe can be doubled
  • Shortcrust pastry, 1 crust, store-bought or homemade
  • Jam, raspberry or strawberry, heaping teaspoon for each note
  • Sugar to sprinkle
  • Egg wash (one egg beaten well)
  • Flour for dusting

Preheat oven to 190 degrees C/375 degrees F. Lightly flour your surface and roll out the pastry. Thinner means neater love notes since they will puff up less than thicker pastry. In any case, we are talking a range of .32 -.64 cm (1/8-1/4 inch). The notes regardless can be pricked all over with the tines of  a fork before placing in the oven to discourage the formation of bubbles. As a template to cut pastry squares, I used a plastic container's 10 cm/4 inch lid.


Position each square as to present a diamond shape. Place jam in centre. Less jam means more behaved notes. More jam is tastier but also results in messier notes. I went for more jam and I don't regret it. Fold the lateral points towards the centre, without overlapping too much.


Fold the bottom point towards the other two points. Seal with a heart. Lightly press down to ensure contact among the various overlapping layers of pastry. Coat with egg wash and sprinkle with sugar. Again if presentation is important to you, then brushing the edges of the pastry which touch each other with egg wash will assist in their remaining closed while being baked.


To make hearts, I folded small squares of pastry and traced with a knife without slicing through the fold, a half of a heart. I carefully cut around that half, then . . .


. . . opened the square and removed the heart.


Bake for fifteen minutes on a lined baking sheet.


They taste wonderful with coffee, tea, or milk. Served warm or cold, they are delicious. They freeze well also. I now know what the next batch of pastry scraps will be used for!


À la prochaine!

Thursday, 30 January 2020

Installation Of Photovoltaic Panels

Photovoltaic panels are less detrimental not only to the environment but also to our utility bill. Though it is said that the single most important contribution to combat climate change an individual can make is lessening the amount of meat consumed which we do, we also embrace the replacement of oil and gas with electricity every chance we get. Chez nous, all power tools, including garden ones are electrical. Our car for the last five years has been a Zoe, an all-electric Renault vehicle. Installing the panels is just the first step in our grand plan to go all electric in our home. Next will be getting a storage battery so we can use what the sun gives us during the day after when it sets. Following that will be getting more panels; we have eight presently, the section of our roof exposed to the south can take a total of sixteen.  And in the hazy future, we envision the banishing of the gas boilers, both for heating the house and water, along with the gas stove, from our domain.

Our jumping through both financial and bureaucratic hoops⁠—our city's approval was required to ensure that no historic building would be defaced⁠—took a couple of months. Thanksgiving sales, even though France doesn't celebrate La Grande Fête Américaine, are referred to as Le Black Friday/Weekend Soldes, the only french words being le and soldes which means 'sales' in that phrase. We of course were too broke to partake, but feeling so self-satisfied it was because we saved our pennies for solar panels. The installation crew arrived the beginning of December. The day was a gloomy one and would prove to be very noisy also as drilling through our house's two-foot stone walls was a rumbling, vibratory affair, but I focused that this project was all about the sun. In the below photo, if you look hard enough, past the leafless trees, you will see the expanse of panels across the roofa cool glimmer as if we dementedly agreed to putting up an ice-skating rink up there.


That dark hose coming down through the eaves and then entering the house wall into the garage holds the electrical wiring connecting the panels with . . .


. .  . with various meters, here's one, . . .


. . . and another . . .


. . . and yet another one. They are adorning the cellier's wall and keeping the wine bottles company. Instead of trooping down there only to get confused by what these meters are metering, we can comfortably gaze at a web page replete with charts showing the ebb and flow of our little home solar energy production. We can't wait until the days get longer and hotter.


So far the only adjustment made in our routine, is instead of using delayed settings for our washing machine so the laundry will be done by early morning, I try to run it when the sun is shining. As with most European models, this washer has its own built-in, electric heater.


À la prochaine!

Thursday, 23 January 2020

Euthanasia of Dirac, The Older Of Our Two Beloved Cats

Dirac's kidney insufficiency when it recently was diagnosed after three months of various puzzling illnesses, including the highest temperature the Vet had ever seen and a front leg's abscess the size of a ping pong ball, logged in at a quality-of-life-destroying sixty five percent.

Dirac being only five years old made his developing the disease unusual as it is seen typically in much older cats. In any case, it is mostly a hidden sickness. As the damage spreads, super cells, nephrons, take on the burden of purification until they, too, give out, and that's when pronounced symptoms appear like bloody vomit, loss of appetite/weight, lacklustre fur, lethargy, excessive urination, and disorientation. The earliest symptom is gradually increasing thirst which was not easy to note in Dirac as he went outdoors a great deal. A cure is not possible, only a treatment consisting of three days of IV to lessen the accumulated toxins that his kidneys are no longer able to filter. He spent the nights with us, but his vein was kept open via a device and bandaged until the treatment was finished. He improved for a week during which he went out to sniff out intriguing smells and climb trees, manicuring his claws with great enthusiasm all the time looking at me with bright eyes. He again deteriorated to the point where he stopped eating and couldn't walk in a straight line because his eyes no longer tracked his head movements.

Before we brought him to the Vet for the last time, we had discussed euthanising Dirac and continued to so while he was in his carrier letting out feeble cries from time to time in the back seat. When asked how much suffering he was experiencing, the Vet stated that no one knows exactly how much, but since his quality of life was so diminished, that he without a doubt was suffering. I also kept in mind that one Vet had written on the Web that constant tail waving in cats, unlike dogs, is the equivalent of crying in humans; the last two days Dirac's tail never stopped wagging. She informed us of the enormous damage his kidneys had sustained and that the positive effects would last just a week, necessitating repeated bouts of the invasive treatment.

Once those two aspects were made clear, The Calm One and I nodded in silent agreement that Dirac would be euthanised as soon as possible. She put him to sleep while we gently touched him as we wept. Then The Calm One remained and I left to wait in our car while she finished administering the second injection, the one to stop his heart. As I saw The Calm One approach, he was dangling the empty carrier, the carrier in which he had carried Dirac so many times in the past three months. His face was marked with anguish but his step with determination. To do the right thing is never easy. 

I have decided not to post a photo of our beautiful boy when he was healthy as the biggest ordeal for me was to see him get progressively and irreversibly unhealthy of which I had the hardest time to accept though I eventually did. He was sick, very sick, when we authorised his death. What I want to remember is despite his bad state he died in dignity, with our loving him to the end (we placed our caressing fingers as close to his nose as possible so perhaps he could smell our scent and know it was us, that he was not with strangers) and the Vet calmly, expertly ending his misery. That scene will be lodged in my memory always. The following day I remarked to The Calm One that I felt remiss I was no longer offering constant care to Dirac, to which he replied, that by ensuring him a peaceful death, I fullfilled an important aspect of that care.

Our three-year old cat, Eli, bounds with energy and loves his food. Cats are marvels.

Thursday, 16 January 2020

Artwork Series: Faber-Castell Polychromos Pencil Drawing of Two Desert Roses

After a long hiatus, I am once again doing art on a steady basis. At present, I am getting up to speed on a medium that I haven't ever done, that of coloured pencils. Most days during the last two months I have practiced with top-of-the-line pencils (oil-based Faber-Castell Polychromos), but with inexpensive paper. I chose my various subjects from a notepad cover, my own photography, an art book of Toulouse-Lautrec's work, and a Pinterest board of mine, titled Drawing Ideas. I also watched some videos such as The Virtual Art Instructor among others. There are so many fantastic artists showing how they do art plus they respond to questions in the comments section! I remember back in the day when I would take nightly art classes after my full-time library job was done, what all the instructors, with the rare exception, would do were to walk around, saying nothing. On the other hand with YouTube artists I don't need to sit through a boring class as I can stop watching the video plus I didn't waste time going to and from a lacklustre course. Additionally I can switch teachers without a hitch, and they can be offered patronage if so desired.


Final Draft

After familiarising myself with the medium and feeling more confident, I was ready for an upgrade to high-quality paper, specifically, Clairfontaine's pochette dessin, papier blanc à grain, 224g/m2, A3. With the aide of The Calm One, a sheet was carefully and neatly halved. The lush colours laid down like velvet on the plushy paper! Once that initial delirium passed, all kinds of problems began to pop up, but I knew the paper was resilient enough to take on those challenges. What visually grabs you in your subject is what precisely needs to be captured.  My being instantly smitten by the below photo was because of several characteristicsthe exquisite buoyancy, close to weightlessness, throughout the picture plane; silky smooth petals contrasting against the fuzzy texture of the sepals; plumpness of the roses; the warm colours of blue-green and peachy-pink set against a cool, dark background; specific details like dew drops/sharp light and dark contrasts/fuzzy little hairs edging the sepals & petals; five levels of distance, starting from the nearest to the farthest:

  • 1. lower, larger rose
  • 2. higher, smaller rose
  • 3. the two stems
  • 4. blurred leaves
  • 5. dark green background

Pinterest photo from which my drawing is based

Basic preparation goes a long way such as practising on a separate piece of paper the effects I wanted to achieve along with choosing the appropriate colours by holding individual coloured pencils close to the subject. For those that came near to a good match, I made a colour menu, keeping in mind some of them might need to be deleted and some added as the drawing progressed.


I lightly drew the subject with a HB pencil. A good deal of time was spent to get placement and form as close to the original as possible which necessitated a good deal of erasing. On with the colours! Eventually my drawing advanced to the stage represented by the below photo on the left. How did I get to the final result shown by the below photo on the right? By spending nearly as much time refining it that I did to get a reasonable facsimile, albeit, a dull one, in fact, downright gloomy. Why was it like that despite being a decent rendition of the subject? The roses themselves lacked a contrast between light and dark while the background was much darker which competed for attention. The background was lightened by adding white and lifting off colour with facial tissues/an eraser to a certain point which was not enough to make the background less dominant. My guess is instead of layering black with dark phthalo green, if warm grey V (274) was used, the colour would have been light enough. Therefore, the roses needed to be brightened to hold their own. After more colours were layered on, mostly carmine rose and cobalt green, they were smoothed with the less vigorous blending stump so as not to lift off too much of the added colour.


The upper stem's thickness was made less to match the lower one by fading more of its edge into the dark background. Baby oil was used all over not only for additional blending but also to bring out the vibrancy of the oil-based pigments even more.


There are several ways to highlight details. One method is incision which is pressing the paper with a tool with a rounded point. To replicate fuzz/moisture under the rose's tip which remarkably resembles a dolphin's mouth, I applied dots with a deadbeat ballpoint pen. Though there are purpose-built tools, I figured since I share our abode with the deadbeat ballpoint champion collector of the world, that it wasn't necessary to get a special gadget. When the colour is put on, it doesn't fill in the marks, leaving a trail of visible white dots. Another way to highlight is scratching the paper with the colour already drawn in with a craft knife. That is how the slightly longer 'hairs' were done above the rose's tip . . .


. . . and along the sepals.


Yet another highlighting technique is lifting colour with erasers which are available in kneadable form (so a particular shape moulded by the artist can lift that exact shape), squat little sturdy rectangles that can be kept clean and somewhat shaped by rubbing them against rough sandpaper, and delicate eraser tips held by a holder. The strong highlights on the lower rose was first made by outlining their shape with a HB pencil and then steering clear of that area when applying colour. A light film of colour eventually drifts into any uncoloured area, so the highlights had to be made more evident by erasure.


The dewdrop on the upper rose's tip was made with both colour and scratchings. Since the light is coming from the left side, the strongest highlights needed to be on the left side of the dewdrop. The bulging bit in the middle of the rose was made more pronounced via shading.


Darker carmine rose accents and cobalt turquoise was shaded in to make a sepal look like it was pulling away from the rose.


Was I satisfied with how it came out in the end? Despite not rendering the subtlety throughout the picture plane, that is, one of graceful cheerfulness, because the roses finished being much more vibrant than their background, I did accomplish all the other aspects which I found alluring in the photo of two desert roses. In addition, I now know how to simulate a whispering of colour permeating the entirety of a drawing which requires keeping the contrast less demarcated by maintaining the background and subject in tonal values fairly light to moderate. Keep in mind, a flat subject melding into a dark background as in my first version, appearing foreboding and a bit mysterious, could be used if that effect is desired. My final version was neither one of lightness or gloom, but more dramatic, resulting from a pairing of a moderately toned background with bright subjects. Being familiar with as many perspectives and techniques will allow me to grow as an artist.

À la prochaine!

Polychromos colour pencils used for this drawing:

White, 101
Cream, 102
Warm grey II, 271
Cobalt green, 156
Cobalt turquoise, 153
Geranium lake, 121
Rose carmine, 124
Deep scarlet red, 219
Earth green, yellowish, 168
Dark chrome yellow, 109
Dark phthalo green, 264
Black, 199