Showing posts with label Fertiliser. Show all posts

Thursday, 23 March 2017

The Bloomin' Rain!

Days of rain. And mud. But also flowers!  The little troop of about two dozen, cherry-red Darwin hybrid tulips are showing off their bold colour, alluring sheen, and elegant blooms. 


Tulips for the most part are not as reliable as daffodils, therefore they are worth planting each fall for an incomparable jolt of Spring colour.


Iberis sempervirens (candytuft) is an evergreen ground cover that blooms the same time as many spring bulbs. The dying foliage of knobby-rooted flowering plants stores nourishment for future blossoms. But being in a state of decline is not pretty so candytuft does a fantastic job of covering up limp and yellowed leaves.

White species (this type does return reliably each spring) tulips and candytuft

We recently tootled off in our electric Zoe to the south of chez nous. The Calm One dropped me off at a plant nursery as he needed to go to one of several community associations with which he is involved as consultant, tinkerer, and teacher. Whipping out my list, I got loads (OK, OK a few unlisted items found their way into my cart!):  bulbs to plant now for summer blooming like tuberous begonias and dahlias, potting mix for indoor tomato sowing, potted herbs/veggies like chives/basil/sweet red peppers, treatment for black spot in roses, 2-9-9 fertiliser for tomatoes/strawberries, and . . .


. . . wondrous dehydrated horticultural mix. A pot only needs to be one-third full and then watered copiously. Voila, before you know it, you got a completely filled container. Yes, baby! Did I say that it is light as a feather? I was able to tuck the bag under my arm as if it was a pillow. Upon The Calm One's return (I had told him via the portable, that is, mobile phone, that I and the contents of my cart were ready to be picked up), we unloaded the groaning cart into the roomy hatchback boot of the Zoe, and then sans fumes and noise, we zipped on back home. Life, at times, can be a breeze.


Peas are always a challenge to grow in southwest France. They have to be sowed by mid-March to avoid the heat of summer which is significant by June, but the soil also has to be workable which is hard to do with all the rain. Happily, those conditions were met and there will be peas this season! The day after planting, the rain considerately did the watering for me. The bed is covered with horticultural fleece to stop the starlings from disturbing the seeds as birds know when cultivation is happening. I had left the area briefly and on my way back, I saw a gleaming and deceptively black beauty flying away from that bed with a squiggling worm in its beak.

The fleece allows rain and sunlight to get through to the planting

Within a day or two, rhubarb harvesting will begin!

The middle plant is small because it is recovering from being forced last season

The strawberries are putting out more and more flowers so it's time to scratch-in around each plant some fertiliser high in phosphorus and potassium like the one with a NPK of 2-9-9 which I recently bought.

The overwintered leeks are doing well

Our getting two colds in three months plus the inclement weather stopped The Great Iris Transplant in its tracks as lengthening days and abundant rain have resulted in their becoming bushy and close to flowering. So transplanting will wait until after their blooming.

Pink perennial geraniums are popping up on the middle right

À la prochaine!

Tuesday, 10 July 2012

Early Summer Harvesting: Onions and Garlic...and growing mushrooms

Daily summer abundance of healthy, fresh, delicious home-grown produce is now a reality.  A recent, late-morning harvest basket contained beets with their red-ribbed greens, carrots, onions, green beans, basil, strawberries, and raspberries.


If I want a salad to munch I just get what is available in the garden.  Onions rings, grated carrots, heat-resistant crisphead lettuce, baby beet slivers and their tops, Parmesan shavings, and yogurt/olive oil/chili dressing was one such impromptu salad.


Or if I want a hot veggie side dish, I braise some radishes in butter, sugar, garlic, and apple cider vinegar.  Radishes cooked in this manner have a milder taste, closer to that of turnips.


We are shameless lovers of mushrooms chez nous.  I always wanted to grow our own meadow mushrooms.  The Calm One bought a discount kit at Lidl for a few euros that was a complete bust--no mushrooms.  Undaunted, I bought another kit at my plant nursery and this time, oh, nice, nice, nice mushrooms!  It takes about a couple of weeks to start harvesting mushrooms which lasts over several weeks.


The mushrooms are just gorgeously fresh and when sliced, their gills are a lovely pinkish brown instead of the typical dark brown. It is just wonderful to be able to slice one or two mushrooms into a salad instead of having to deal with a whole punnet/pint or fishing out a few mushrooms out of the bulk bin and bunging them into a plastic bag and weighing them.  Ugh, I hate supermarket shopping.

Dayo is staying out long hours and apparently recharges his furry batteries by reclining on some young carrot seedlings.


The hard neck garlic did not put out scapes as it seems they don't provide those delectable flower stalks in hotter climates which is a little disappointing because I wanted so much to make scape pesto with them.  However, as there is a bumper basil crop, I can still make pesto.  I am very pleased with my harvest because they are huge bulbs.  I grew soft-neck garlic last season, and though they store longer, the cloves are so small and too pesky to handle.  I did an accidental experiment as I forgot to sidedress with fertiliser one half of the bed.  Well, not surprisingly, the fertilised half yielded much larger bulbs.  When there are two to three brownish lower leaves, then it is time to harvest garlic.

Garlic ready to harvest will have a few green top leaves


Garlic is quite fragile so no drying out in the sun.  As soon as possible after pulling them up out of the ground, shelter them in a shady place for curing. I will lightly peel off dirty outer wrappings if requiredThere are enough bulbs for eating and some for planting this autumn for next season's crop.  I reserve the largest and best bulbs for sowing.

Garlic yet to be tidied up in the background

I did remember to side dress the onions and most of them are delightfully big.  There is a point just above the head, along the green stalk, that gets soft, causing the plant to keel over.  If about three quarters of the onions have keeled over, then that's a go ahead to harvest.  If the weather promises to be wet and therefore increasing the chance the onions may be susceptible to rotting, I will test to see if that spot is soft enough for it to fall over with a little help from myself.


Onions can be left right where they are harvested for a few hours to dry out and then they join the garlic in an airy spot, sheltered from sun and rain for several weeks of curing and eventual storage in a cool, dark place.

A small part of the onion harvest

Before curing the onions in a place sheltered from rain and sun, I clean them up a bit by peeling off any dirty, loose wrapping, being careful that I don't get carried away with the peeling.  With this moist season, some onions needed a bit more peeling than usual.  In the below photo, the onion on the left is untouched, the middle one is what most of the onions required, and for the one on the right, is what some particularly dirty onions went through--it will completely dry with a lovely golden brown skin eventually.


This season's garlic and onion harvest

The garlic and onions will stay under the pergola for several weeks before they will become fully dried and ready to have their roots and tops trimmed.  Onions store well for about six months in a root cellar.  After that, I will freeze the remaining.

RELATED POSTS

Planting onion sets
Fertilising onions 


Tuesday, 26 June 2012

Potatoes and Tomatoes: Continuing Early Summer Care

This summer with temperatures in the mid and upper eighties and lots of rain has been kind to gardeners in our area.   Lilies are so fragrant that it takes just one bloom to perfume my potting room and keep me happy as I prepare flats of broccoli and Brussels sprouts for an autumnal harvest.


The English lavender is in full bloom while the taller and lighted-coloured French lavender is just starting.  Most of our lavender is in our front garden.  I love when I see passersby catching a whiff and walking away smiling.  Lavender has a very fresh and uplifting fragrance.


I use lavender as a culinary herb and for making lavender water.  I pick the freshest flowers for kitchen use, just a few buds, before they open.  Supposedly English lavender is better for culinary and cosmetic use, but I can't tell the difference.  Lavender goes well with roast chicken and in creamy salad dressings as long as you go very easy on the quantity or else your dish will taste like perfume.  Some prefer to grind the buds for a powdery texture.  Picking off the buds in ample amounts for lavender water is tedious though, but then again, the fragrance surrounding you helps you keep at it.

When making lavender water, I add boiling water just enough to cover fresh buds and let steep until cool, making sure I squeeze the flowers as dry as I can to extract their fragrance.  Just as with rosewater, I freeze the strained lavender water in ice cube trays, taking what I need for the bath as required.  When dried--I spread the buds on trays--lavender is perfect for linen closet sachets and in potpourris.

The tomatoes are doing well despite a delayed planting because of cold temperatures in late spring.

Early season Marmande tomatoes

I grow both interminate and determinate tomatoes.  The former bear fruit throughout the season and seem to do best when they are pruned and staked.  The later kind fruits all at once and are fine without pruning or staking and are a boon when you just have run out of time for yet some more pruning and staking.  I scratch in a high potassium fertilizer--NPK formula with a high last number-- for both kinds when flowers appear.  Mulching deeply cuts down on both watering and weeding.  We are allowed by city edict only to water our gardens early in the morning or late at night as those times are best to lessen wasteful evaporation.

Staked indeterminate varieties:  Beefmaster and Marmande

In the foreground are bushy plum-shaped Romas, a great sauce tomato

Pruning the indeterminate type means pinching off the little branch that grows in the crotch of two larger branches.  Ideally, you want just one leading/head branch twirling around the tuteur.


As for the potatoes, when plants are about eight inches high, it is necessary to side dress with a high phosphorus fertilizer--NPK formula with a high middle number--and hill them.  This mounding prevents any potato close to the surface turning green from sunlight exposure.


The seed packet shows the slant of the hill

When plants are about a foot high, I hill them again for a final height of about six inches.  In block beds, there is not enough soil to do what is required, so I either use compost or grass clippings.  The only pests this season were a few snails who munched a bit on the leaves, not causing much damage because I heeded the early signs and lifted up the terracotta roof tiles framing the beds and picked all the snails off which put an end to that problem.  The tiles are not only decorative, they function as snail and slug traps.

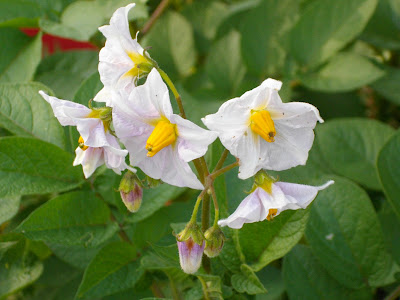
Potato flowers are quite pretty and were much loved by Queen Marie Antoinette who wore them in her hair.


A bed of Desiree, a yellow-fleshed, red skinned late season variety

Early season potatoes are the best for harvesting about now, that is, new potatoes, but a few plants of mid-season and late-season varieties can be dug up also.  Since the potatoes are small, usually just a pull on the plant near the base is sufficient to remove them from the soil.  If not, than spade or fork carefully around the mound and collect the potatoes.  Detach the potatoes and let them dry out of the sun for a few hours if they are coated with moist earth.


After scrubbing, tiny new potatoes just need some steaming and usually no peeling to get them mouth-watering tender.  Immature later season varieties, like the mid-season Mona Lisa pictured above, require boiling and for my taste, peeling.  Add some fresh minced green herbs--I tossed in lovage, flat-leaf parsley, chives, and basil--and butter with a sprinkling of fleur de sel before serving for a tasty, visually pleasing side dish. 


RELATED POSTS


Wednesday, 18 April 2012

One Potato, Two Potatoes, Three Potatoes!

Spring so far has been unusually cool and rainy for southwest France.  I am not complaining.  Much time is saved because I don't need to water, the soil is a pleasure to work, and everything looks and smells so freshly green.

Main part of the potager viewed from a second-story window

The pansies may actually last for another month or so before getting done in by heat.

Some of the pansies started from seed last autumn enjoying a cool breeze

Les Fruitiers are just starting the next stage of their cyclic growth.  Their tiny but perfectly formed fruits never cease to delight.  Despite their minuscule size, details like individual grapes, fuzz on peaches, and the distinctive silhouette of figs can be seen clearly.

Grape vines provide both fruit and veggies as I use the leaves to make dolmades

Our fig tree has two crops, one in spring and a larger one in autumn

Garden-grown potatoes (pommes de terre in French=apples of the earth) are stupendous, out-of-this-world tasty, so different from store bought that with my first taste last season, I decided it was a new vegetable, one that the rest of the world greedily had succeeded in hiding from me!

Certified seed potatoes are the surest way of not starting with already diseased potatoes.  Note well that seed potatoes are chemically treated and therefore are not edible.  The seed potato itself eventually shrivels into a dark, hard mass making it easy to discard when harvesting.

Sprouting or chitting increases the number of planted potatoes that will grow into plants, while making that growth quicker.  It takes about six weeks to chit potatoes so keep that in mind when ordering them.  If there is no time to properly sprout them, they can still be planted as most of them will grow.  Place them with the sprouts facing up in a warm, sunny place.  The appearance of the desired, dark-coloured sprouts is triggered by sunlight.  Remove any long, white, brittle sprouts which may have grown because of lack of light.  Sometimes the skin harmlessly wrinkles during sprouting because of dehydration.  They are still fine to plant.

Desiree, a red-skinned, late-season variety happily sprouting on a sunny window sill

When sprouts are about an inch to two inches long, the potatoes can be planted outdoors.  If seed potatoes are large enough, they can be cut into chunks containing one or two sprouts.  Let the cut surface dry for a day.

Planted potatoes can take a light frost, and if necessary horticultural fleece can be used to protect them.  In my climate, I plant early ones by mid March, mid-season varieties by end of March, and the late-season main crop by mid April.  This schedule enables successive harvesting for both fresh eating and storage.  Also choose varieties that lend themselves to the kind of recipes you do--firmer ones for steaming and salads, drier or mealy ones for baking, and an in-between texture for all-purpose.

Loosen and aerate the soil deeply with a spade and fork in some compost if you have it.  Then make an six-inch-deep and a spade-wide trench.  Sprinkle the recommended amount of bonemeal at the bottom.  Bonemeal supplies a big hit of phosphorus (the second number in an NPK formula) which promotes root development.  It is considered suitable for organic gardens.  As cats go nuts over bonemeal be careful you do not bury a small, beloved pet along with the seed potatoes.


When bonemeal is cruelly denied to Dayo, he settles for a nice snack of apple blossoms

Cover the bonemeal with an inch of soil, then place seed potatoes about fifteen inches apart with sprouts pointing upwards.  For chunks, put the cut end on the soil.  Three potato plants fit crosswise in my block beds.

This variety is mid-season Mona Lisa

Using a rake, pull the soil piled on the side down over the potatoes, filling in the trench.  A small plank can be used to firm the planting.  Place it where needed and gently step on it.

About two weeks later:  lusty, emerging potato plant

When my motivation ebbs during digging trenches, I take a break under the pergola and think of herb and sour-cream onion/potato/saucisse de Strasbourg soup or potatoes au gratin or the Calm One's speciality, kitchen-sink potato salad containing herring, apples, cornichons, hard-boiled eggs, salami, tons of mayo, and oh yes, some potatoes, cleverly cut into perfect, itsy-bitsy cubes via an egg slicer.  I then hobble from the comfort of my seat and manage a few more goes with my spade.

RELATED POSTS

Herb & sour-cream onion/potato/saucisse de Strasbourg soup
Kitchen-sink potato salad

Wednesday, 11 April 2012

Some Like It Hot

Spring here in southwest France is continuing at a brisk pace.   The fresh green of young leaves along with the calming blues and mauves of lilacs, bluebells, irises, and sweet violets  contrast with the snappier yellows of pansies and the whites of tulips.

Lovely, oh so fragrant lilacs

White Tulipa Fosteriana, a species tulip, drenched in rain

However, I have to guard against any surprise, overnight cold snap.  For a few nights, the flowering strawberry beds needed a cosy fleece cover to guard against frost.

Dayo can't tell the difference between a strawberry bed and his bed

Though gardening can be very relaxing, it is also demanding, offering windows of opportunities that are often short.  The onions planted in mid February are now about five inches tall and need to be fertilised so a good harvest in July is ensured.  

Though onions are bulbs, rather than using a fertiliser high in phosphorus which promotes root development, it is thought better to use either a high nitrogen or a balanced one.  In order for each layer of an onion to be formed there needs to be a corresponding leaf--those tasty, blade-like things are leaves!  Nitrogen boosts green growth and therefore in this case green growth boosts bulb development.  Nice, fat onions please!  Yum.  I gently hold back the rather brittle leaves with the back of my hand as I go down rows, scratching the fertiliser into the soil with the side of the cultivator so as not to break off any of the leaves.

A side dressing of 10-10-10 fertiliser is gently worked into the soil

Meanwhile, heat-loving veggies/herbs like tomatoes, bell peppers, basil, melons, courgettes, and cucumbers need to be started indoors about six weeks before the last frost day which is about mid-May here.

A special soil-less mix for sowing is best.  As it is very fluffy, light, and airy which is perfect for delicate roots, it is necessary to add water and get it very moist before putting it into flats in order to fill the containers adequately.

Moistened commercial sowing mix, transplants, recycled food containers

Fill up clean flats almost to the top with the well moistened mix and press down lightly.  Seeds sparingly spaced will cut down on later thinning. Larger ones like melon/squash seeds can be individually spaced and smaller ones can be placed using a moistened toothpick.  Label rows of different varieties as you sow.  Cover lightly with a bit of dry mix and then press down again, this time more firmly, to let the moisture seep up into the dry mix.  This method prevents seeds from moving about which would disturb spacing and confuse identification. 

The flats now have to be kept warm.  I use an enclosed electric incubator but the flats can be kept on a heating pad also as long as a makeshift tent of plastic is kept over the containers and the flat is fitted with a drainage tray.  

Incubator has a vent as to prevent mould formation if it gets too moist inside

As soon as green growth is spotted, get them out of the incubator and onto a sunny windowsill or under artificial lights.  Days here are usually warm enough for me to take them outside as long as I remember to bring them back indoors in the evenings.  A gentle wind also strengthens their stems.  Some people blow on their tomato seedlings or use a fan indoors to toughen them up!  Any delay in getting light to them will stress them, and when stressed, plants tend to race forward in an desperate attempt to go to seed so as to pass the next generation on.  Instead of developing into sturdy, bushy plants, they will become leggy and fragile.

When you spot the first set of leaves, it is time to snip off some seedlings at the level of the mix with scissors to establish good spacing.  This way, none of the remaining seedlings' roots will be disturbed as they would be if you pulled out the rejects.  Choose the most vigorous ones.  A good spacing is when there is enough room between plants to be able to separate them when transplanting into separate little pots without injuring their roots.  Each seedling should  have a nicely defined though small root ball, a root ball of their own so to speak.

Four varieties of duly marked tomato seedlings in their recycled food tray.

Once the plants have a second pair of leaves, that is, true leaves--second pair of leaves resemble the leaves of the mature plant, unlike the first pair--and are about two to three inches tall, transplant them. A re-potting mix which has been lightly moistened will encourage good growth.  I use an old teaspoon as a mini-trowel and a small knife to get them out of the flats into separate small pots.

Rows of sturdy seedlings are cut like slices of brownies with a small knife

Make a small hole in prepared pot and place root ball into hole

 When handling delicate seedlings, pick them up via a leaf and not by their stems.  If the stem breaks, that's it, it dies.  If just one leaf comes off, you still have a living plant.  Put tomato seedlings deeper into the pot then they were in the flat. Tomato stems can sprout roots, hence your transplants will be supported by a robust root ball when setting out into the garden.  Carefully firm the mix around the plant.  Label and water them until the water runs out the bottom, and then re-water when the surface goes almost dry.  Keep them under good light, whether artificial or natural. 


Roma tomato seedling safely set in its new home

Think you are done?   I am afraid not!  Go ahead and get ready the outside area for your seedlings as it is best to let prepared soil to settle for a few weeks before the actual transplanting is done.  If you find your motivation flagging a bit, think of all those red, ripe, juicy tomatoes you will eventually gobble up. 

RELATED POSTS

Planting onion sets
Growing strawberries
Seed variability test