Showing posts with label Mushrooms. Show all posts

Thursday, 24 September 2020

Ink Cap Mushrooms, Deliquescence & Art

A quartet of ink cap mushrooms (Coprinus comatus) recently appeared in a sizable planter filled with lobelia.


The hefty pot is supported by another large pot.

The whole structure makes a nice visual closure for the main garden path.

Within forty-eight hours, the ink caps transformed into an elongated button shape, fresh and edible, to a form more open with beginnings of inkiness.


The underneath of the cap blackened with curling edges.


The perimeter kept curling and blackening.


Little pieces broke off as they softened.


The cap finally became complete goop.


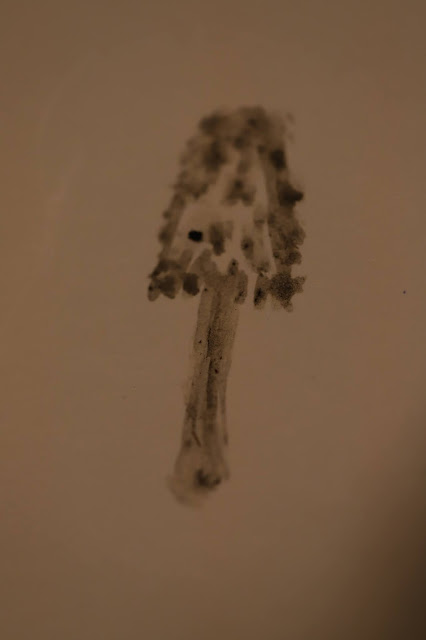
All the clumps of ink were placed in a recycled yogurt container, water added, and stirred well.


A quick sketch was made with a slender brush resulting in a drawing of an ink cap using the ink made from itself.

À la prochaine!

RELATED LINK

An excellent article explaining why ink caps digest themselves

Thursday, 16 April 2020

Covid-19 Cooking: Duxelles

On the thirty-first day of Lockdown in France (Confinement Jour 31), I made duxelles which is a fairly straightforward technique of intensifying mushroom flavour by lessening the moisture content, allowing not only for various uses like pizza topping, pasta adornment, soup and stew enrichment among others, but also for freezing where, because of their reduced state, they won't take up much space. The most important aspect is that the texture doesn't become leathery and tough. You want intense flavour, but tender tidbits at the same time. If most of the liquid already is wrung from them before being sauteed and they are cooked in a large, shallow skillet, the duxelles will be subjected to drying heat for a much shorter time therefore remaining soft despite containing much less moisture.


Ingredients
makes 500 ml/a little over 2 American cups (recipe can be halved)

  • Mushrooms, fresh, 1 kg/2.2 lbs (I chose white button mushrooms, but any edible ones, wild or cultivated, can be used though the taste will vary from mild to strong depending on the variety)
  • Butter, sweet, 3 T
  • Salt, table, 1/2 tsp

As demonstrated by the above list of only three ingredients, this version is the most simple available among numerous recipes. In our household, duxelles is mainly used for pizza topping therefore the plainest form will be more compatible with the garlicky, herb-enhanced tomato sauce and the well-seasoned, often red-wine-enriched Toulouse sausages which also go onto the crust. However, if you desire racier versions, be rest assured they exist with various additions such as garlic, onions, cream, herbs, and booze. Either clean the mushrooms with a soft bristled brush or with a dry paper towel. Slice and then coarsely chop which is just the right size for pizza topping. A finer mince could be more suitable for other dishes.


The cleaned 'rooms are in the foreground, outside the plastic punnet

Drap an old tea towel/dish cloth over a large bowl, pressing it to conform to the bowl's inner contours. Put the amount of chopped mushrooms that can easily fit once the towel is pulled around the mass and twisted closed. Old tea towel you say? Old enough that you don't mind it getting stained, but not so worn and thin that it will tear during the vigorous wringing process.


Squeeze by twisting tighter and tighter and also by massaging the 'bag' with your hands. At first not much liquid will ooze out. After a while, more and more will. Stop when most of the liquid is either squeezed out or you are tired (my preference!). Repeat until all the mushrooms are done. The mushroom liquid is quite plentiful. I couldn't find any information regarding if it could be used in other recipes or if it could be frozen. I am guessing if the raw mushroom liquid is used almost immediately as in a veggie smoothie, than it probably will be okay. Melt the butter over medium high heat in the largest, most shallow skillet you have or work in smaller batches if you only have small/medium sized pans. Add mushrooms and salt. Saute, while stirring frequently, for about five to eight minutes or until the duxelles no longer clump together, are slightly golden, and greatly reduced in volume. Don't mistake their being glazed with butter as moisture.


They then can be portioned and once cooled, popped into the freezer or kept for several days in the fridge.


Though the photo (I forgot to take one of a pizza with duxelles!) below shows how I used to strew a homemade pizza with commercially packaged, pre-sliced, frozen mushrooms which were then thawed before sauteing and added to the yet-to-be baked pie, I ask you to imagine how it would look instead with a dense sprinkling of duxelles applied before baking. Here's a clue: its appearence was charming. Additionally the flavour, texture, and aroma were way up there.


À la prochaine!

RELATED POSTS

Cream of Mushroom Soup Redux


Tuesday, 10 July 2012

Early Summer Harvesting: Onions and Garlic...and growing mushrooms

Daily summer abundance of healthy, fresh, delicious home-grown produce is now a reality.  A recent, late-morning harvest basket contained beets with their red-ribbed greens, carrots, onions, green beans, basil, strawberries, and raspberries.


If I want a salad to munch I just get what is available in the garden.  Onions rings, grated carrots, heat-resistant crisphead lettuce, baby beet slivers and their tops, Parmesan shavings, and yogurt/olive oil/chili dressing was one such impromptu salad.


Or if I want a hot veggie side dish, I braise some radishes in butter, sugar, garlic, and apple cider vinegar.  Radishes cooked in this manner have a milder taste, closer to that of turnips.


We are shameless lovers of mushrooms chez nous.  I always wanted to grow our own meadow mushrooms.  The Calm One bought a discount kit at Lidl for a few euros that was a complete bust--no mushrooms.  Undaunted, I bought another kit at my plant nursery and this time, oh, nice, nice, nice mushrooms!  It takes about a couple of weeks to start harvesting mushrooms which lasts over several weeks.


The mushrooms are just gorgeously fresh and when sliced, their gills are a lovely pinkish brown instead of the typical dark brown. It is just wonderful to be able to slice one or two mushrooms into a salad instead of having to deal with a whole punnet/pint or fishing out a few mushrooms out of the bulk bin and bunging them into a plastic bag and weighing them.  Ugh, I hate supermarket shopping.

Dayo is staying out long hours and apparently recharges his furry batteries by reclining on some young carrot seedlings.


The hard neck garlic did not put out scapes as it seems they don't provide those delectable flower stalks in hotter climates which is a little disappointing because I wanted so much to make scape pesto with them.  However, as there is a bumper basil crop, I can still make pesto.  I am very pleased with my harvest because they are huge bulbs.  I grew soft-neck garlic last season, and though they store longer, the cloves are so small and too pesky to handle.  I did an accidental experiment as I forgot to sidedress with fertiliser one half of the bed.  Well, not surprisingly, the fertilised half yielded much larger bulbs.  When there are two to three brownish lower leaves, then it is time to harvest garlic.

Garlic ready to harvest will have a few green top leaves


Garlic is quite fragile so no drying out in the sun.  As soon as possible after pulling them up out of the ground, shelter them in a shady place for curing. I will lightly peel off dirty outer wrappings if requiredThere are enough bulbs for eating and some for planting this autumn for next season's crop.  I reserve the largest and best bulbs for sowing.

Garlic yet to be tidied up in the background

I did remember to side dress the onions and most of them are delightfully big.  There is a point just above the head, along the green stalk, that gets soft, causing the plant to keel over.  If about three quarters of the onions have keeled over, then that's a go ahead to harvest.  If the weather promises to be wet and therefore increasing the chance the onions may be susceptible to rotting, I will test to see if that spot is soft enough for it to fall over with a little help from myself.


Onions can be left right where they are harvested for a few hours to dry out and then they join the garlic in an airy spot, sheltered from sun and rain for several weeks of curing and eventual storage in a cool, dark place.

A small part of the onion harvest

Before curing the onions in a place sheltered from rain and sun, I clean them up a bit by peeling off any dirty, loose wrapping, being careful that I don't get carried away with the peeling.  With this moist season, some onions needed a bit more peeling than usual.  In the below photo, the onion on the left is untouched, the middle one is what most of the onions required, and for the one on the right, is what some particularly dirty onions went through--it will completely dry with a lovely golden brown skin eventually.


This season's garlic and onion harvest

The garlic and onions will stay under the pergola for several weeks before they will become fully dried and ready to have their roots and tops trimmed.  Onions store well for about six months in a root cellar.  After that, I will freeze the remaining.

RELATED POSTS

Planting onion sets
Fertilising onions