Tuesday, 18 September 2012

How to Make Purple Plum Leather

The Isle river which passes close to Montpon, a village in the Dordogne region, has a pastoral aspect that's soft and inviting.

The Isle river near Montpon, about an hour's drive from us

We were at Montpon to prepare for the arrival of some family members at their gite.  As we had a hard time finding the place, the Calm One set up a paper-towel flag to help them find their holiday home.


This building appears to have original half-timbered walls so I am  guessing it is several hundreds of years old.  And no, that is not their gite!


Since it was blackberry season, I had an eye out for wild bushes.  My eyes lit up when I found these bushes, but the super sharp Yucca spikes guarding them made me realize despite my being a blackberry addict, no way was I going to slash my arms to get to them.  I hope any birds interested in them were careful.


We did not stay long as not to get in the way.  Also, though Monsieur and Madame M kept a careful eye on both Dayo and the garden, they were all on my mind because an unrelenting heat wave in the blasting furnace category would not let up.  Before our departure, I had moved the many pots from the marble garden table into shade.  Upon our return, I accepted how inconsiderate I was by not keeping that surface free sooner.  It was embarrassingly obvious how deprived Dayo had been. 

A calm but alert Dayo surveying all that is his

The plum d'ente tree like most of my fruit trees this season put out a much smaller harvest than usual.


As I already made plum jam with a much more ample harvest of Mirabelles, and as The Calm One likes purple plum leather, purple plum leather it will be.  Fruit leather is an effective way to preserve lots of fruit.  Wash, pit, and chop plums.


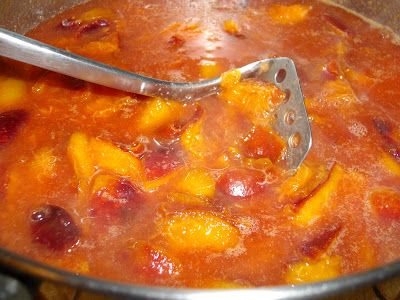
Add 1/2 water to four cups of chopped, pitted fruit.  Let it simmer gently for about 10 to 15 minutes until tender, mashing here and there.


Start with a tablespoon of sugar and a teaspoon of fresh lemon juice for each four cups of plums. Stop adding lemon juice when you can begin to detect a slight 'burn' when tasting.  Add some freshly grated nutmeg and ground cinnamon to taste.  Cook another ten minutes until thickened.


Sieve through a Foley mill.


If not convenient to use the puree soon, freeze it.  Line shallow baking pans with oven-safe plastic wrap.  Silipat or its equivalent can be used as plastic wrap tends to flap over the leather as it is drying in the oven, especially in convection ones, which causes the leather to stay moist along the edges and corners making its removal a bit tricky.  In that case, cut off the sticky bits and then pull the remaining leather away from the plastic.  Oiled parchment paper has been suggested as an another alternative.  I would test its waterproof worthiness with a small amount of puree overnight in the fridge before actual use.


For my size pans, I pour in about a quart of puree to a 1/4 thickness, using a soft spatula to spread it out evenly.

What a superb burgundy colour!

Place pans in a oven set at 50 degrees C, cracking open the oven door if necessary.  My pans took about twelve hours to dry sufficiently, most of that time was overnight.  If the puree is spread to only an 1/8 inch, it will dry faster, but I personally prefer leather that is thick enough to retain some moisture. When testing if it is ready, touch lightly the whole surface--it needs not to be wet, soft, or sticky.  Slightly tacky is OK.  Be careful not to dry the leather too much or it will become brittle.  If that does happen, it will still be edible, just not possible to roll up.  Peel plastic off and place the leather on parchment paper.


Using scissors, trim any ragged edges and cut the paper-backed leather into strips, roll up, and store in a lidded container in the fridge.  I cut it just like I do fabric, with my left hand holding down the leather while my right hand takes long, clean sweeps with the scissors.  However, leave your sewing scissors in their basket and use only kitchens shears!

All those fresh plums became one medium-sized jar of leather

My leather resembles a thinner, plebeian version of pâte de fruits--it's moist, thick enough, with intense flavour to be considered more like an informal dessert than a snack.  I like having a strip or two with coffee.  The colour is warming on a chilly autumn day also!


Tuesday, 11 September 2012

A Short Visit to Cognac...and how to make grape jelly

We recently spent a lovely late afternoon and evening at Cognac, about an hour's drive from our home.  We arrived early for our dinner rendezvous with friends so we could explore a bit.  The Charente river with its banks lined with weeping trees and gracefully spanned with stone, arched bridges lend a relaxing, dreamy quality to that part of town.


Several French friends including Madame M who was born in Cognac, have said oh, Cognac, those people keep to themselves.  No one actually said anything unpleasant, but the repetition of that predictable sentiment made me wonder.  Once we left a busy square with its statute and restaurants, I was fascinated with what I perceived as a town imbued with a confident satisfaction.  The narrowness of the cobblestoned streets along with a stunning late-afternoon blue sky with billowing clouds encouraged me to focus my camera at the intersection between the roofs and the sky.


Cognac's early wealth first came from producing salt; it was somewhat later when the wine growers, faced with an overly abundant grape harvest, decided to distil wine into brandy.  Foreigners then moved into Cognac, especially from Ireland (Hennessy), to give their expertise on distilling.  Though Cognac is well loved by French people as a summer vacation spot, the streets were all wonderfully quiet.


In France, a half-timbered house is called une maison à Colombages.  The one below dates from the 15th century and originally was the home of  le lieutenant général de Cognac, Pierre de Lacombe.

Maison de la Lieutenance

I love to find visual vignettes when I am walking through French towns--little scenes potently complete in their beauty.  In Cognac, they were hard to find, it was as if the old quartier was one complete visual image with its cream stone houses, white shutters, ironwork, elegant house numbering, winding streets, and roofs intimately aware of the sky.  I was spellbound.


Back at the potager, I was delighted to see the starlings were not able to eat most of the grapes as was their habit in past seasons, especially the purple ones which I wanted to use for jelly making.  Dayo sporadically checked to see if the horticultural fleece I clipped onto the grape vines to protect them against the starlings was in good shape.


The Chasselas grapes are really luscious, nearly golden with bronze highlights with an intense, sparkling flavour when fully ripe.


I make jelly from our Muscat de Hambourg grapes.

They resemble blueberries!

Before making grape jelly, please read my general approach to jam making here.  I keep it as simple as I can, with a minimum of specialized equipment,  technique, and ingredients while producing a jam safe for consumption.  My jams though sweet have a depth of flavour because garden-fresh fruit is used, but they are usually a little less thick than commercial versions because I do not use additional pectin.  My jams soak a bit into the bread instead of slithering on it like some commercial products.  Grape juice and jelly is very staining, so wear old clothes.  Non-plastic utensils are best as they resist staining.  The dishwasher, better known as The Calm One, has reported that our beige plastic ladle is now a dull green.

Purple Grape Jelly
(Makes about a quart)

  • Purple grapes, washed and de-stemmed, 4 lbs
  • Water, 3/4 cup*
  • Grape juice (extracted from the 4 lbs of de-stemmed grapes), 5 3/4 cups*
  • Sugar, 3 1/2 cups*
  • lemon juice, freshly squeezed from one lemon
 *Cups are based on the American measure, 8 oz

Place grapes and water into a non-aluminium pot big enough for the contents to take up just one-third of the pot.  Bring to a boil and then simmer for ten minutes, mashing the grapes well.


Put the contents of the pot into a Foley Mill to extract the juice.


Place the grape juice, lemon juice, and sugar into the cleaned pot.


Bring to a rolling boil for about 15 to 18 minutes.  I use the sheeting test to determine the jellying point.


Skim off the foam and pour into recycled, clean jars.  Screw on caps tightly while carefully protecting your hands with oven mitts/potholders, and turn the jars upside down until cool.  They will keep in the fridge for a year.

I ladle hot jelly into the metal gravy boat which is used to pour jelly safely into jars

The jelly can be spread on bread of course, especially a rustic loaf; it will soak well into its crevices.  However, if I feel extravagant I will take advantage of its more fluid nature when still slightly warm and use it as a thick desert sauce on yogurt which is topped with crème fraîche.  In other words, an instant parfait. Spooning through the tepid, gooey jelly to the cold, dense, rich crème fraîche to the lighter, pudding-like texture of the mild yogurt is a delight.


Wednesday, 5 September 2012

How to Try to Make Peach Melba...and how to propagate strawberries

Peaches are lovely fruit--friendly in a fuzzy way with every golden, flushed-with-red orb of juicy sweetness being beyond delicious.  When to pick peaches is almost as a heated debate as picking tomatoes.


Some say since harvested peaches will not produce any more sugar, they must be ripe, while others insist that they can be picked partially ripe and they will soften and be sweet.  Amazingly they are both right.   Sugar production is halted once picked.  However harvested peaches' acidity gradually lessens allowing the sugar already produced to be more pronounced.  Fully ripe peaches are great for eating out of hand, preferably over the kitchen sink as they are so juicy, while firm peaches are good for poaching and jams.

A Charentais melon sharing a basket with peaches

Decades ago when I was a young lass, I had to this day what was the best dinner of my life.  It was served to me on the porch of a restaurant in Woodstock, New York while a summer sunset over the mountains provided a gentle glow.  Though the entire meal was wonderful, the Peach Melba dessert was so scrumptious I still to this day have not found its match in perfection.  My hopes did rise when a Paris friend brought us to a well known brasserie close to his apartment near le jardin du Luxembourg.  He told us how the Polidor have customers who frequent the place so often that their own napkins are reserved for them.

As soon as I saw the canned sliced peaches suffocating in fluffy mounds of whipped cream pocked with spots of thin raspberry sauce, I knew the fabled Woodstock Peach Melba would retain its top place against all contenders.  I reluctantly turn around, expecting to see all the restaurant customers swooning in dismay at this travesty of a Peach Melba.  But no, no one but me noticed while our French friend nonchalantly shrugged off this horror.

Since our garden is producing both peaches and raspberries at the moment, and Picard down the street stocks an excellent vanilla ice cream, I decided to make Peach Melba.  It is a deceptively simple dessert which was made for Nellie Melba:  poached-in-syrup fresh peaches filled with vanilla ice cream and topped with fresh raspberry sauce.  I used Nigella Lawson's recipe.  

Sugar, lemon, peaches, and vanilla bean

My poached peaches were delicious but the texture was fibrous and the skins so difficult to remove that I, like the Polidor, sneakily suffocated the halves with ice cream as to hide their stressed state--at least I did use vanilla ice cream and not whipped cream!  The one served at the Woodstock restaurant was presented so simply, just a large peach half filled with a neat scoop of dense ice cream artfully topped with raspberry coulis.

Coulis:  liquidise raspberries, confectioner's sugar, and a bit of lemon juice, then strain.

Though my attempt was better than the Polidor's--but then again, any would be--I would not come back for seconds if this was restaurant fare.  However, I did thoroughly enjoy the melting ice cream intermingling with the raspberry coulis.


I reluctantly accepted that the quality of my peaches just did not cut the grade as this season in general was not conducive to good fruit harvests plus the peach tree had an infestation of mites early on which would explain the fibrous texture and difficult-to-remove skins.  Next season's harvest hopefully will be better.  It was the first time I poached fruit and I liked the technique, especially getting an intoxicating whiff of vanilla while I made up the poaching syrup.  If you do make Lawson's recipe, remember to use the best peaches possible.

Vanilla bean infusing in simmering poaching syrup

Growing strawberries takes a bit of know how to pull off well, but the effort is well worth it.  They, along with tomatoes, have the most pesticides on them of all supermarket produce.  Also, home-grown varieties' flavour are incomparable.  Now that I have successfully grown them, I am super focused on propagating my three varieties via runners.

One of the three is a continuously fruiting.  Though June bearing ones are fantastic and are presented as the ultimate in strawberry quality, nowadays there are excellent strains bearing well into the fall.  La Savoureuse de Willemse is a huge, fragrant, splendidly flavoured strawberry.  We have been eating about a pint of these weekly since the June bearers stopped fruiting a couple of months ago.


Strawberries start to put out runners in summer and rev up their production in late summer.  One runner can contain several baby plants.  Snip off the runner and gently tuck the baby plant root down in a prepared area. 

Runners cascading over the edge of a strawberry bed

If their bed is ready, I will make a transplant directly into its permanent location, if not which is the case this summer, I will transplant into shallow containers like recycled food trays, protecting them under horticultural fleece over the winter.  The setting out into their final destination can take place by end of September or be postponed until early spring.

RELATED POSTS

Transplanting strawberries
Freezing strawberries
Making strawberry jam
Glazed fresh strawberry pastry-free tartelettes
Uses for horticultural fleece

Tuesday, 28 August 2012

How to Harvest Charentais Melons and Grow Carrots...plus making velouté de carottes

Since we live in the Poitou Charente region of France, it's appropriate to grow succulent, fragrant Charentais melons which look like smoother skinned, small cantaloupes.   To check ripeness,  I smell the unattached end of the melon, often having to contort myself as not to break the vine, but nothing is more disappointing than a melon not bursting with ripe flavour.  It also needs to be flushed with gold and feel heavy.  Stopping watering around a week before harvesting may prevent melons splitting.  During the end of August, I walk and sniff around the melon patch because a split melon that is mostly ripe will fill the air with its heady fragrance.  If I note a split melon soon enough I will be able to eat it before the ants do.


When moving to France over a decade ago, the first dinner I was invited to had as its first course a slice of cantaloupe au nature, separated from its rind, cubed, and served on said rind.  Presenting melons this way emphasises their freshnessThough melons  can be halved, seeds scooped out, and be eaten with a spoon, chunks have a satisfying texture and are a bit neater to eat.  First scrub the outside of the melon with a veggie brush under running water to prevent dirt and bacteria being transferred to the melon flesh.  Cut the seeded halves into slices, slip a knife between the rind and the flesh, and then slice in thick pieces and either serve on the rind or in a dish.  The Calm One eats way more fruit when it is not a chore for him to do.

Slice on the bottom is separated from its rind and cubed.

Luscious, juicy, golden chunks

Watering has been necessary all throughout August and doing it at twilight is a mellow time both Dayo and I enjoy.  He needs to make sure each and every time I drag out the yellow hose that it has not become a snake.  He is very careful about such matters.

Iris foliage, yellow hose, and snake handler Dayo lit up by the setting sun

Carrots have an infamous reputation in the veggie patch as being difficult to grow.  Baby or short, round carrots are a cinch, but if you want substantial carrots it gets a bit more demanding.  My soil is semi-conducive to carrot growing, so half the crop comes out looking like this:


While the other half come out like this:


And if I am really lucky, I get a carrot as intriguing in appearance as this:


About two and half years ago, when I first started to grow our produce, I left out root veggies because home-grown did not seem to be cost-effective as store-bought is so inexpensive, and I had the mistaken conception that the quality would not be that different than if I grew my own.  In addition, the soil was a little stony which would impede the growth of succulent roots.  Be rest assured, beets, potatoes, onions, and carrots grown in the garden are exceptionally flavourful--earthy with a touch of sweetness and worth the effort.

Once you decide what size root is best for your soil--I choose mid-long varieties--the three main problems with growing carrots is that their seed is small so it is difficult to space well, they are vulnerable to getting blitzed by carrot fly, and they take several weeks to become little plants making weeding difficult.

I usually plant two carrot crops, one in early spring and the other in late summer as they prefer cooler weather. For the fall/winter harvest, I choose varieties which can withstand some frost and can be stored in the ground as the soil here does not freeze deeply.  First I prepare the area by spading, removing weeds and as many stones as possible, and forking in compost, letting the bed settle down for a week or so before actually sowing.  Young plants don't take kindly to either an impacted soil or a very loose one.

Taking a large pinch of seeds, I slowly deposit them by rubbing them between my first two fingers and thumb as I go down the furrow--spacing is about four to five inches between rows in my block beds--that has been partially filled with sowing mix.  Using sowing mix will not turn magically a stony soil into the perfect one for growing carrots, but it will allow for a greater number of tiny seeds not to meet up with a pebble or a soil lump that would prevent it from starting the growing process.  Once that process is started, the roots may not form straight, but they will form.

Rake, carrot seed packet, and sowing mix.  Note how fluffy the sowing mix is compared to the soil.

I then sow some widely spaced large radish seeds down the rows and then cover up with a light dusting of sowing mix.  Radishes sprout quickly, marking the row and guiding weeding plus I get a few radishes to eat as I harvest them in several weeks, allowing plenty of room for the carrots to develop, usually about three to four months. Using the back of the rake, I tamp down the rows and water thoroughly with a light spray.  To encourage sprouting, I keep the bed moist, but not soaked.

Once the plants are about two inches high, I place horticultural fleece over the bed, securing it by tucking it under the tiles framing the bed.  The fleece forms a mechanical barrier against carrot fly preventing its depositing eggs which would become legions of  hungry munchers devastating crop yields.  You would not be aware of this underground devouring until harvesting.  There is at least one variety that is resistant to carrot fly, but there are so many delightful varieties that aren't.

Velouté in French cuisine means the addition of chicken broth and cream which lends a velvety richness.  This is a gorgeous soup in taste and looks. It gives me immense pleasure when all the veggies and herbs in a recipe come from my potager Potage after all is the French word for soup. 

Velouté de carottes
(6 servings)

  • Carrots, 8 large, sliced about 1/4 inch thick
  • Chicken broth, preferably homemade, 2 liters
  • Cream, 500 ml
  • Potatoes, 4 medium
  • Celery, 1/4 cup or preferably lovage, 1/8 cup
  • Onions, 2 medium, chopped
  • Parsley, flat leaf, a few sprigs and extra for garnishing
  • butter, 60 grams
  • Salt and freshly ground black pepper
  • Bacon, two slices for each serving
  • French bread, two slices for each serving

Melt the butter in a soup pot and let the carrots, onions, and celery/lovage saute for about 15 minutes.  This step brings out the flavour and ensures a nice colour to the soup.  Then add the cubed potatoes and parsley, mixing well.


Pour in the chicken stock and simmer until all the veggies are tender, about 20 minutes. 


Using a stick mixer, blend until very smooth.  Add cream/seasoning and keep hot.  Fry up the bacon, reserve, and keep warm.  Pan fry slices of French bread in the bacon fat. For each serving, sprinkle crumbled bacon and some minced parsley and serve with a slice or two of fried bread.


Bon appétit!


Tuesday, 21 August 2012

How to Make French Onion Soup...and fresh green bean salad

With temperatures in the nineties, summer is reaching a climax.  This tall Queen Elizabeth rosebush is preparing for autumn with a last spurt of growth, reaching for the clear, blue sky before its petals drop and hips form.  Remember to refrain from fertilising bushes as new, tender growth will increase their vulnerability to frost.


I adore green beans and have planted four successions this season.  Succession planting, that is, sowing every ten to fourteen days ensures a steady supply of fresh produce.  Another advantage is protection against less than ideal conditions, for example, insect infestations happen just some of the time during the growing season so chances increase at least part of the crop will come in nicely.


An easy and delicious way to serve green beams is to make a salad.  Snap the ends off and break into small pieces.  Boil small potatoes for about five minutes, adding the beans for another five minutes or until the veggies are tender.  Slice the peeled potatoes and pat them and the beans dry.  Toss them into a bowl along with a crushed garlic clove, some apple cider vinegar and olive oil, Parmesan shavings, fleur de sel, and freshly ground black pepper.  This salad can be served tepid or chilled.  Use French bread to sop up the dressing--a simple, fast, and delicious supper.


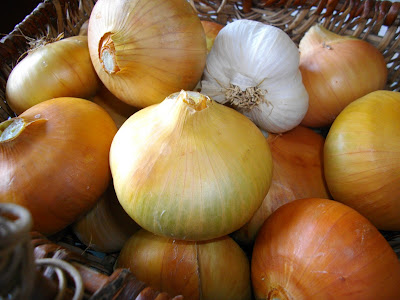
After a month of dry curing onions and garlic under the pergola, I tidied them by shortening their tops and clipping their roots.  About a week later, I trimmed off the rest of the garlic tops, and they are now stored in a cool, dark spot in the sous sol. The onions need more curing before they can be stored.  Just as with garlic, when there is no smell when snipping them close to the bulb, I will know they are ready for storage.

The largest garlic bulbs will be planted this fall for next season's crop

Dayo likes to hang out under the pergola with me because it is much cooler there.  He also helps me as I discard the dry tops of onions and garlic, diligently swatting some as they fall from the table, guiding them into a compost crate. 


French Onion Soup or Soupe à l'Oignon Gratinée is a staple in our household throughout the year.  Though proper carmelisation is important, using home-grown onions heightens the taste even further.


INGREDIENTS
(recipe make four servings)
  • Onions, yellow, thinly sliced, 700 grams
  • Garlic, 1 fat clove, crushed
  • sugar, 1 tsp
  • Olive oil, 2 Tbls
  • Butter, 30 grams
  • Beef broth, homemade or the best you can buy, 2 liters
  • Bay leaf, crumbled, 1/8 tsp
  • Thyme, 1/8 tsp
  • French bread, slices, 8
  • Gruyere cheese, grated, 200 grams
  • Additional crushed garlic and olive oil

I find onion soup easier to eat if the onions are not sliced into rings, so I halve them first and then slice.


Bring the olive oil and butter to a bubbling boil in a heavy bottomed pot.  If the pot is broiler safe, then the same pot can be used to complete the dish.


Add onions, garlic, and sugar and over high heat, cook for about 6-10 minutes until most of the onions have browned edges.


Keep heat as low as possible and let carmelize about 30 to 40 minutes.  Fresher onions will take longer than older ones.  Sample them from time to time to get an idea what partially carmelized onions taste like.  When they are fully carmelized, the depth of soft, moist sweetness will knock you over.  It does for me, each and every time.

The onions will have the colour of caramel

Pour in the beef stock, stirring well with a wooden spoon to dissolve all the browned goodness at the bottom of the pot.  Add thyme, bay leaf, salt and freshly ground pepper and simmer, partially covered for an hour.


While the soup is simmering, preheat oven to 350 degrees F.  Cut two slices of French bread per serving.  Though this recipe can serve four, I freeze half of the soup for another meal as there are just two of us, making the rest of the croutons at that time. Slices should be not much more than 1/4 inch thick to prevent them from soaking up most of the soup.  On a shallow oven pan lined with oven-proof paper, mix a couple of crushed, large garlic cloves and several tablespoons of olive oil.  Rub both sides of the bread slices in this mix until well coated.


Put the tray in the oven for about 25 minutes, flipping over the slices after 12 minutes.  The slices should be fairly dry and golden brown.  Grate the cheese and divide into two equal piles for each serving.  Preheat broiler to the highest setting. 

Since I halve the recipe, I make about five large croutons to fit into my Corning casserole

Float the slices on the surface of the soup in a broiler-safe casserole and cover them with the cheese, each pile mostly going on top of a slice as some will land in the soup.  Place the casserole about four or five inches under the heating element and broil for about 3-5 minutes.  Carefully bring piping-hot casserole to table and serve in soup plates.


Bon appétit!


RELATED POSTS

Sowing, fertilising, and harvesting onions